Prefabs
You can find the example project here.
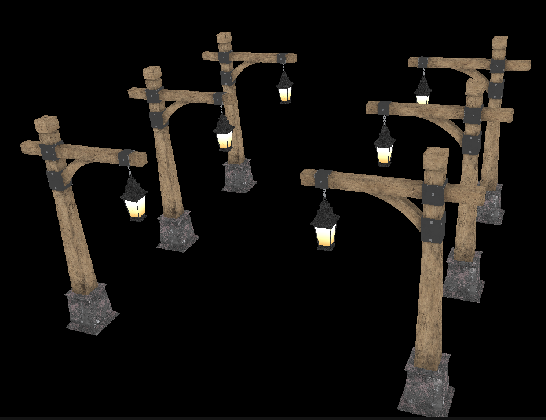
This chapter demonstrates how to create reusable components with Prefabs. We want to create a road lined with street lamps, and we want a light switch to turn them all on and off together. As the lamps are all identical, we will create a Prefab containing a single lantern and use it six times.
Prefab concept
Let’s do some theory first, we’ll see how this works in the example in a second.
A Prefab groups a piece of scene graph and a number of scripts and resources into an encapsulated entity which can be re-used multiple times. A Prefab contains everything to make its objects visible as well as the logic and functionality required for dynamic behaviour.
Prefabs are helpful for
creating re-usable components (think of templates or widgets), and utilizing them multiple times
structuring your project into modules for better overview and maintainability
re-using parts of one project in another project as external references
To use Prefabs you need to create a PrefabInstance object and assign a Prefab to it. The PrefabInstance can be used in the scene graph just like any other node. All contents of the Prefab appear inside the PrefabInstance as a copy. If the Prefab is modified, all changes are immediately applied to all its PrefabInstances.
As a Prefab is a self-contained entity, its components can not be linked directly to other components. Likewise, the copied objects inside of a PrefabInstance are read-only and updated from within their Prefab. So how can we make PrefabInstances individual and interactive?
That’s where Lua Interfaces come in handy. They are simple lua scripts which just hold values. Those values can then be read by other scripts inside the instance, and are not shared among PrefabInstances. They represent quite literally the “interface” of the Prefab - the properties a Prefab “offers” to whoever instantiates it. Every aspect of the Prefab which you want to be able to control per-instance needs to be represented by an input parameter in such a LuaInterface. The outputs of these interface scripts are linked inside the Prefab, either directly to nodes or to other Lua scripts used internally.
Note that Prefabs are a powerful feature inside of Ramses Composer for structuring your scene and keeping in control of complex content. When you export your RAMSES scene, all Prefab hierarchies and instances will be converted into a single scene graph. Prefab Instances are replaced by simple copies of their current content. You will find no Prefab or Prefab Instance objects in the RAMSES scene at runtime.
Setting up the example
We start by setting up the scene as usual: Import the meshes from GLTF by right clicking on the scene graph and choosing “Import glTF Assets…”. Leave all checkboxes checked. Make sure the new Node has the “render_main” tag. Create a material and textures and configure their uniforms (here: u_AmbientLightColor: 1, 1, 1, u_AmbientLightIntensity: 1, u_BaseColorFactor: 1, 1, 1, 0). For this project you need to add the link to the Defines URI in the Property Browser of the Lantern Material.
Here, we are using the meshes from Khronos Group GLTF lantern example (public domain).
There is no need to think about Prefabs at this time yet, any part of the scene graph can be packaged into a Prefab later. It is also possible to restructure Prefabs at any time. The next prefab example will introduce more complex uses of Prefabs.
Creating the Prefab
Now that we can see our single lantern, let’s create a Prefab around it.
To make a Prefab you first create an empty Prefab object with Create Prefab in the context menu. The Prefab will show up in the Prefabs View.
![]()
You can now move parts of the scene graph into the Prefab by dragging or pasting them. We drag the Lantern Node in and delete the empty Lantern.gltf. You will notice that the lantern disappears in the preview. Prefabs are not visible as they are just templates. Once we create an instance for it, we will see our lantern again.
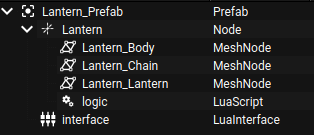
Next we add two scripts to the Prefab. We can create content directly inside the Prefab with the context menu, just right-click on it. Here they are:
lantern_interface.lua (named interface) will be our LuaInterface to the outside. It has just one parameter lightSwitch, which will be handed on to the inside.
lantern_logic.lua (named logic) is our LuaScript which does the actual manipulation of the objects inside the Prefab by transforming the lightSwitch parameter into a vector. First, link up the lightSwitch with the interface. In order to link the vector up with the shader to control the light, you’ll need to select the Lantern_Lantern MeshNode and check the checkbox for Private Material. That way you can override shader attributes locally, such as the u_EmissiveFactor color or u_AmbientLightIntensity, and thus also add links to the output parameters of the LuaScript.
For this simple Prefab we only used one Script and one Interface, but more complex uses in real life will probably require more than that. As an example, you could add a script in between the interface and the actual logic to perform input validation or transform external units into those used internally. You might even have multiple interfaces which control different aspects of the Prefab. For a more complex example, you can take a look at our Nested Prefabs tutorial later.
Instancing the Prefab
Now we want to see our lantern again. For this we create a PrefabInstance with the context menu and name it lantern1. Empty PrefabInstances are generic empty containers, so we need to assign the Prefab Template it should use in the properties. After selecting our Lantern Prefab, you should immediately see the PrefabInstance fill with objects and our lantern appear again in the preview.
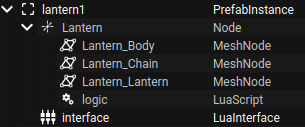
Note that all contents of the prefab instance except for the interface scripts are shown as disabled. That is to remind you that they are just copies of the Prefab. You can examine their properties but you cannot change the values or the structure here.
Now we create five more PrefabInstances and assign all of them to our lantern prefab. You can manipulate all your instances just like any other node. So we move them to their positions and rotate those that go on the other side of the road. When you manually set the lightSwitch parameter on each of the instances, you should see that particular lantern light up.
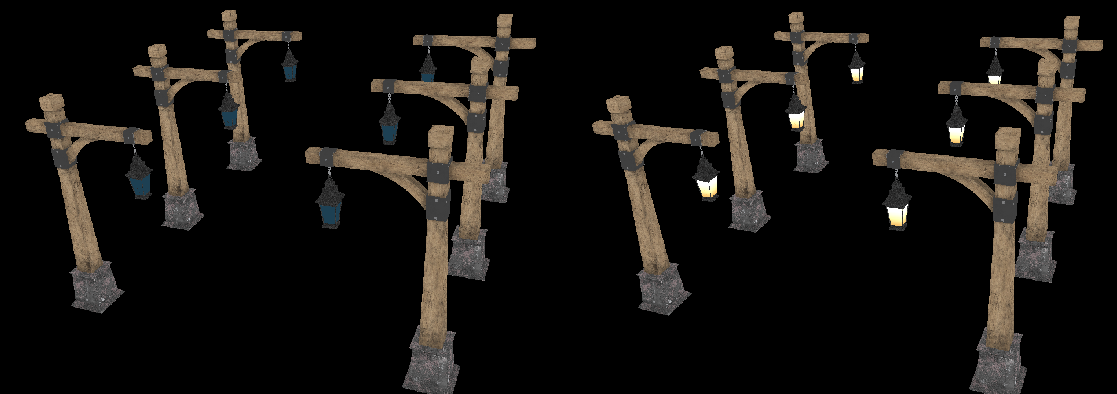
Finally, we add the Lua script for the master light switch. road_control.lua just hands on its single parameter and acts as a sort of user interface of the scene or a substitute for a more complex logic controlling our lanterns. Just select the interface of each lantern instance and link their individual lightSwitch parameters to the output of the roadControl script. When you change its input value now, you should see all lamps coming on.
Tips and Tricks
Be careful not to confuse PrefabInstances with their Prefabs, because of their identical structure. If you change the input parameters of a Prefab’s interface script, this will not affect the existing instances. You can check the properties inside the Prefab content this way and see whether your scripts produce the intended output, but there is no visible change in the preview as the Prefabs are abstract, invisible templates. To see an effect in the preview, you need to change the input parameters of the instances.
Input parameters set on the Prefab interface scripts are copied as default values when creating new instances from them. So you might safe some work by setting useful default values before creating multiple instances as they will be initialized with those values from the start.