Lua Syntax
The Ramses Composer relies on the Ramses Logic Engine to load, parse and execute Lua scripts and to capture and report errors.
You can find the user documentation of the Lua syntax dialect and its specifics at a dedicated section of the Logic Engine docs here.
You can find the exact version of the Logic Engine used by the Composer in the Help->About menu.
Introduction to Lua
This section explains the basics about Lua scripts and how to use them interactively with the Ramses Composer.
Why should you use Lua scripts
Using Lua scripts is generally optional, you don’t need them to create a basic, static 3D scene. However, they allow you to include dynamic behaviour and some business logic in your scene. They enable you to create interfaces and “translate” given information to an specific behaviour and pass on this information via links.
For example:
you get information about the traveled distance as
floatthe tires of your asset should be turning based on the draveled distance
so you convert the “distance float” to one axis of a vector(3) in a Lua script and link this vector to the rotation property of your vehicle’s wheel.
This way you can translate potentially application-specific data (the travel distance of a car in meters) to the abstract representation of a 3D scene (the vector3 rotation property in this example). As you guessed, you can then extend the Lua scripts to do more things - use different metrics, simulate different inputs etc. while not changing the wheel object itself. Of course Lua can be useful to make debugging easier, e.g. by emitting debug data.
How to include and use your Lua scripts
There are two different ways to use Lua scripts in your scene / project.
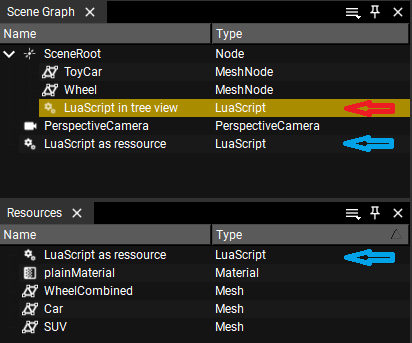
included in your scene graph (red arrow)
as a resource, visible both on top level in the Scene Graph view and in the Resources View (blue arrow)
What’s the difference?
Basically all Lua scripts work in the same way, regardless of their location, this is just a feature to allow you to get them organized conveniently within your project.
If you put them as children of a Node into the scene graph, you can group them logically and keep object specific behaviour closely together. You can always change their location and order if you like. This topic is particularly interesting for including Lua scripts in Prefabs.
Lua scripts in your Resources view also appear on top level in the Scene Graph. They are easy to find and immediately accessible. This might be the right place for scene-level functionality or scene input.
Including Lua to your project
Open the context menu in your scene graph using right click and select Create LuaScript as shown. Make sure not to confuse LuaScripts with LuaInterfaces, those will be explained later in the aforementioned prefabs tutorial.
When you execute this step in an empty area of your scene graph or in your resource browser, an independent (empty) Lua script object is created. In case of right click on a node in your scene graph, a Lua script object will be created inside of your scene graph.
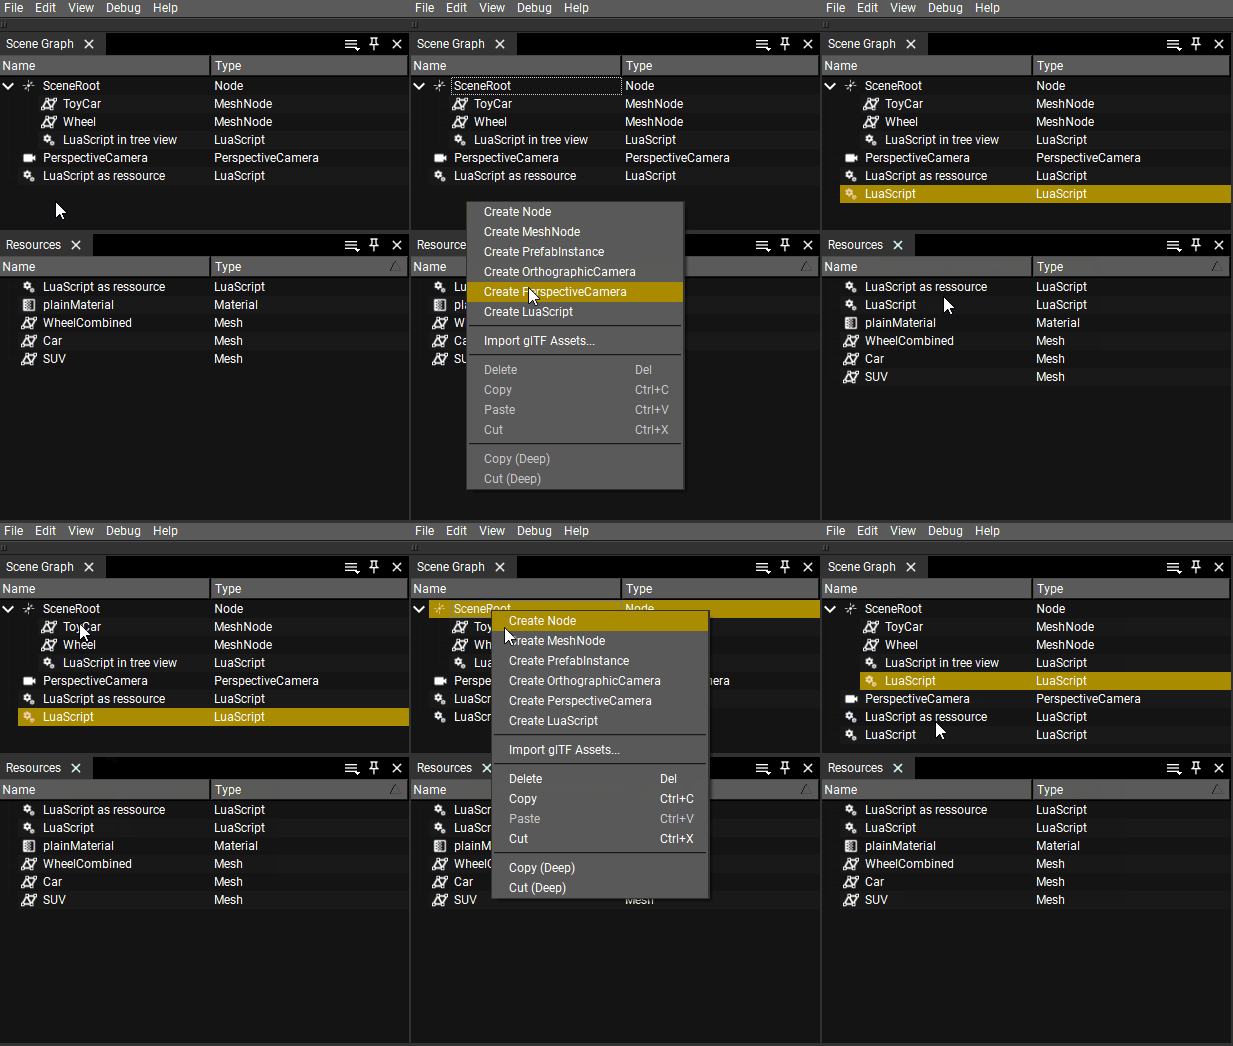
Currently it’s still an empty Lua “node” and marked with an empty orange URI to indicate that something is missing here.
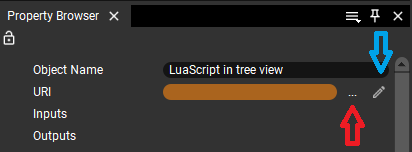
Click on the tree dots ... (red arrow) and select a Lua script in your project folder.
If you have assigned an existing Lua script you can edit this using an editor like Notepad++, ZeroBrane, Visual Studio Code or whatever you prefer.
Hint: You need to define a standard application editing .lua file extensions in your operating system, you can use the pencil-symbol (blue arrow) to open this tool directly.
If you create several Lua script objects with the same URI, this means that you have several instances of the script. They will behave in the same way, but they all have independent sets of input and output parameters and variables.
Understanding errors
Parsing Errors
If your LuaScript contains a parsing error, an error message will be displayed at the top of a property browser for the LuaScript. As an example, if your script is
function interface(IN,OUT)
    IN.value = Type:Int32()
    OUT.value = Type:String()
end

fnction run()
    OUT.value = IN.value
end
you will see the following error message at the top of the property browser for the script:
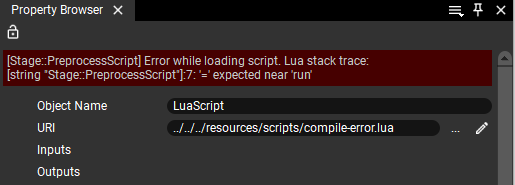
In this example, the script has a syntax error in line 7 - “fnction” needs to be replaced with “function” to fix the error.
Runtime Errors
Besides parsing errors, LuaScripts can also cause runtime errors - errors which only occur when the script is run. Take this example assigning an integer to a string in line 10 if “choice” is greater than 0:
function interface(IN,OUT)
    IN.choice = Type:Int32()
    IN.value = Type:Float()

    OUT.value = Type:String()
end

function run(IN,OUT)
    if IN.choice > 0 then
        OUT.value = IN.value
    end
end
Runtime errors show up at the top of the property browser for the script, just as the parsing errors do:
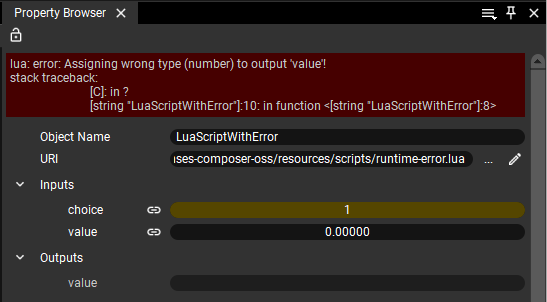
Note that the runtime error only occurs if the line with the runtime error is actually executed - in this example “choice” must be set to a value greater than 0 for the error to occur and be displayed.
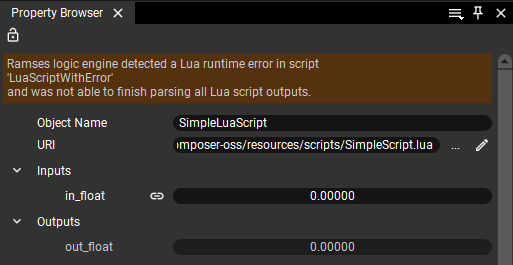
Ramses Logic stops processing the LuaScripts once it encounters a runtime error. To alert the user that a runtime error occurred and not all scripts have been processed, a warning is displayed in the property browser for all LuaScripts:
Debugging
To obtain information from inside a script Ramses Logic supports several debugging functions. These are rl_logInfo, rl_logWarn, and rl_logError which all take a single string argument. They generate a log message of the appropriate catogory which is visible in the log view. These functions are only enabled in normal operation both in the GUI and headless applications but will be disabled if the scene is setup for export. Calling these functions in a Lua script will therefore result in an export failure.
As an example consider the following script:
function interface(IN,OUT)
    IN.choice = Type:Int32()
end

function run(IN,OUT)
    if IN.choice < 0 then
        rl_logError(string.format("choice < 0: %s", IN.choice))
    elseif IN.choice == 0 then
        rl_logWarn("choice == 0")
    else
        rl_logInfo(string.format("choice > 0: %s", IN.choice))
    end
end
Depending on the input variable an info, warning, or error message is generated including the current value of the input. This log message will be generated every time the script is executed.
Shortcuts and Tricks
There are a lot of coding styles and individual preferred structures if you create a Lua script for your projects. Here are some typical use cases which can help save a bit of work time and performance.
Suggestions for Readability
As you know, we can use different types of data, int, float, string and vectors of size 2, 3 and 4. As a recommendation, if you use an IN property more than one time in your script, you should assign it to a local value, it’s much faster!
You should be familiar with these data types, but just as a short reminder, vectors can be used like arrays:
function interface(IN,OUT)
    IN.myVec4 = Type:Vec4f()
    OUT.myOutVec4 = Type:Vec4f()
    OUT.myOutVec3 = Type:Vec3f()
    OUT.myFirstVec2 = Type:Vec2f()
    OUT.mySecondVec2 = Type:Vec2f()
end

function run(IN,OUT)
    local vec4 = IN.myVec4
    OUT.myOutVec4 = vec4
    OUT.myOutVec3 = {vec4[1], vec4[2], vec4[3]}
    OUT.myFirstVec2 = {vec4[1], vec4[2]}
    OUT.mySecondVec2 = {vec4[3], vec4[4]}
end
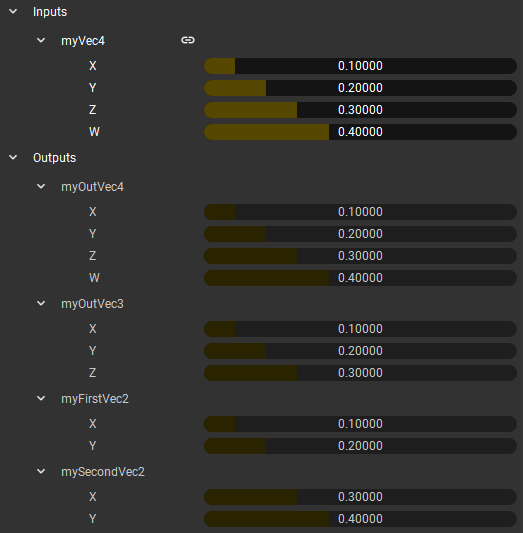
To some Lua script users, this vector syntax may not be very readable { }. A small convenience function can help us and reveal a special Lua feature at the same time.
function vec(...)
    return {...}
end
No, that’s not a pseudo source code, it’s native Lua. This function can take 0-N parameters and returns them as a table, which makes our OUT declarations work all the same:
function run(IN,OUT)
    local vec4 = IN.myVec4
    OUT.myOutVec4 = vec4
    OUT.myOutVec3 = vec(vec4[1], vec4[2], vec4[3])
    OUT.myFirstVec2 = vec(vec4[1], vec4[2])
    OUT.mySecondVec2 = vec(vec4[3], vec4[4])
end
Using and assigning structs
You can create structs to bundle data, but there is no reason to copy/paste your code snippet again and again like this.
function interface(IN,OUT)
    IN.my_IN_Struct = {name = Type:String(), age = Type:Int32(), height_meter = Type:Float()}
    OUT.my_OUT_Struct = {name = Type:String(), age = Type:Int32(), height_meter = Type:Float()}
end

function run(IN,OUT)
    OUT.my_OUT_Struct = IN.my_IN_Struct
end
As a shortcut create a local struct(-value) in your interface() function and use this definition as a type alias, like typedef in C.
(this only works in the interface() function)
function interface(IN,OUT)
    local setting_person = {name = Type:String(), age = Type:Int32(), height = Type:Float()}
    IN.my_IN_Struct = setting_person
    OUT.my_OUT_Struct = setting_person
end

function run(IN,OUT)
    OUT.my_OUT_Struct = IN.my_IN_Struct
end
It’s much more readable and you don’t need to adjust the assignments in your run() function - another side effect, this approach eliminates struct assignment mismatches!
Array vs loop
Sometimes you need to create a kind of array as IN or OUT, but it’s important the label starts with its own defined name like my_sensor_0.
function interface(IN,OUT)
    OUT.my_sensor = Type:Array(3, Type:Bool())

    for i = 0, 2 do
      OUT["my_sensor_" .. i] = Type:Bool()
    end
end
Keep in mind, Lua array indexes start at one instead of zero! The result looks like this:
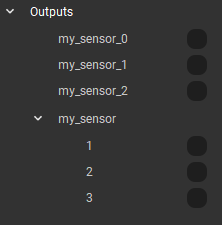
Input properties can be generated the same way, but you can’t assign the values the same way as with a parameter defined as a struct. Every single element need its own assignment.
function run(IN,OUT)
    OUT.my_sensor_0 = true
    OUT.my_sensor_1 = true
    OUT.my_sensor_2 = true
end
Of course you can also assign the values in a loop, similar to our approach in the interface() function.
function run(IN,OUT)
    for i = 0, 2 do
        OUT["my_sensor_" .. i] = true
    end
end
Complex scripts
Sometimes you need a much more complex way to create a solution, for such cases you should read this section.
Thinking objectively
If you prefer to think in an object-oriented way, you can also create objects in Lua scripts. At first you create a simple local table, but define this outside of your functions run() and interface() so it’s global in Lua.
local class_Person = {
    age = 0,
    height = 0.0,
    name = "unknown"
}
But this is still a struct and not an object, so define a function inside this struct and use the object pointer self, without using a new local value.
local class_Person = {
    age = 0,
    height = 0.0,
    name = "unknown",
    print = function(self)
        print(  "Name: " .. self.name ..
                ", age: " .. self.age ..
                ", height: " .. self.height)
    end,
    reset = function(self)
        self.age = 0
        self.height = 0.0
        self.name = "unknown"
    end
}
Now our Lua-class is defined and we can try to set some values and call its methods. Note that the syntax is with : instead of . .
function run(IN,OUT)
    class_Person.age = 18
    class_Person.height = 1.65
    class_Person.name = "Max Mustermann"
    class_Person:print()
    class_Person:reset()
    class_Person:print()
end
Log output:
TestLua: Name: Max Mustermann, age: 18, height: 1.65
TestLua: Name: unknown, age: 0, height: 0
Sure - it’s not really handy to define the same method in every single object and a globally defined function could be in conflict with other objects, so we define a base class, define our methods there and make our person class inherit this base class.
Our global function, which is comparable with [condition] ? [result a] : [result b] in C++
function select(a, x, y)
    if a then
        return x
    else
        return y
    end
end
Also we define a method in base class, which iterates through all variables and sets them to a default value if they exist.
local class_basic = {
    reset = function(self)
      for key, value in pairs(self) do
        local _type = type(value)
        if _type ~= "function" then
          self[key] = select(_type == "number", 0,
                        select( _type == "string", "unknown" ,false))
        end
      end
  end
}
And we inherit this function of our base class in the class_Person object, which we can do with all other tables, too.
local class_Person = {
    -- [...] (known part ahead)
    reset = class_basic.reset
}
The log result has the same output. At this point, have a closer look how it’s written (assigned like a value, not as a function) and keep the order in mind. class_basic must exist before class_Person.
And yes, you are right - it’s similar to a static object in C++. How could we handle an instance of this, because we want to use a couple of individual people?
Add this to our class_basic:
new = function (self, o)
    o = o or {}   -- create object if user does not provide one
    setmetatable(o, self)
    self.__index = self
    return o
end
So we can finally instantiate our “class”.
local class_Person = {
    age = 0,
    height = 0.0,
    name = "unknown",
    print = function(self)
        print("Name: " .. self.name .. ", age: " .. self.age .. ", height: " .. self.height)
    end,
    reset = class_basic.reset,
    new = class_basic.new
}
And use the instantiation e.g. like this:
function run(IN,OUT)
    local persons = {
      A = class_Person:new(),
      B = class_Person:new()
    }

    persons.A.name = "Max Bauer"
    persons.B.name = "Karl Heinz"

    persons.A:print()
    persons.B:print()
end
Log:
TestLua: Name: Max Bauer, age: 0, height: 0
TestLua: Name: Karl Heinz, age: 0, height: 0
Make sure you create the instances with new(). Without it this would happen:
function run(IN,OUT)
    --this is a bad idea
    local persons = {
      A = class_Person,
      B = class_Person
    }

    persons.A.name = "Max Bauer"
    persons.B.name = "Karl Heinz"

    persons.A:print()
    persons.B:print()
end
Log:
TestLua: Name: Karl Heinz, age: 0, height: 0
TestLua: Name: Karl Heinz, age: 0, height: 0
It’s because our class_Person is assigned as a table reference - so it’s the same object.
Make struct output assignments easier
So, currently we have objects to store our data and they can have their own output functions - which is sometimes needed of course. But this isn’t really handy and we want an easier way to handle this.
What we have:
class_basic(to get our methodesreset()&new())class_Personglobal function
select(our shortcut for if-else)empty
interface()run()function to set our data
There is still one task remaining, to match our input or output properties in interface() with our “objects” (still tables) - but we can do it a bit smoother than assigning all data manually.
As a reminder, our class_Person looks like this and includes different data types (int, float, string & functions).
local class_Person = {
    age = 0,
    height = 0.0,
    name = "unknown",
    print = function(self)
        print(  "Name: " .. self.name ..
                ", age: " .. self.age ..
                ", height: " .. self.height)
    end,
    reset = class_basic.reset,
    new = class_basic.new
}
So if we define a local person struct in our interface() with exactly the same members as our object (but without functions, of course ), we will be able to automatically assign the values of our class_Person instances (more or less):
function interface(IN,OUT)
    local person = {
        age = Type:Int32(),
        height = Type:Float(),
        name = Type:String() }
    --in this case, we don't need to declare a new local table (struct) - just for a better overview.
    OUT.Member = Type:Array(2, person)
end
The result should look like this, an empty array of structs:
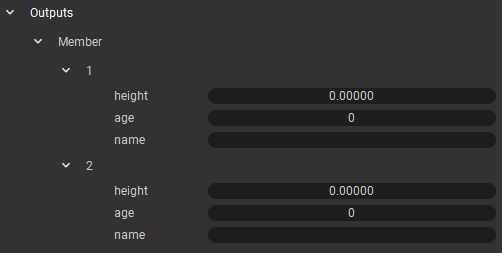
What we now need is a function that compares and sets all primitive properties of our two instanciated objects and assigns the property values of the first to the property values of the second object. There are variations of how to do this, smaller scripts don’t need this kind of structure!
In this case, we’ll define a global function to do this job and call it after everything is done - so in the end of run().
--go through the structure and set each matching output
function setStruct(out, input)
    for key, value in pairs(input) do
        if type(value) ~= "function" and type(value) ~= "table" then
            out[key] = value
        end
    end
end
What exactly happens:
The parameter out represents our OUT.xxx property and input our matching “object”.
Then we parse our table for each entry and assign it to a local value. After this we check what kind of value we have type(value) and ignore all functions and tables (to avoid recursive functions). At the end we use the name of this value to catch the matching one in our OUT and assign the value from our input to the property of the same name in out.
--it's now a "global" variable
persons = {}

function run(IN,OUT)

    persons = {
      A = class_Person:new(),
      B = class_Person:new()
    }

    persons.A.name = "Max Bauer"
    persons.A.age = 22
    persons.A.height = 1.85

    persons.B.name = "Karl Heinz"
    persons.B.age = 65
    persons.B.height = 1.61

    setStruct(OUT.Member[1], persons.A)
    setStruct(OUT.Member[2], persons.B)
end
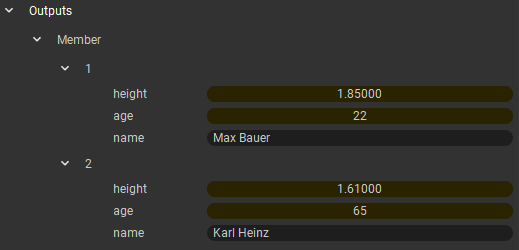
Now our result should look like this:
