Writing an Android app
You can find the example code here.
This tutorial explains how to integrate a Ramses Composer asset into your Android application. We will use the asset from the Monkey tutorial and integrate it into an android application.
We don’t want to repeat the Android documentation here. If you are new to Android, please have a look at the official docs which explain the various aspects of Android. In this tutorial, we assume you have basic understanding of Android and will focus only on Ramses specifics.
If you prefer looking at the final source code instead of going through the tutorial, you can find it in the app_src folder. Note that the sample source code was created with a fairly new Android Studio and may fail to open in older versions of the IDE.
Creating an empty Android app
Create a new project in Android Studio. Select “empty activity”. In this tutorial, we use MinSDK=26, use Kotlin as project language.
Adding Ramses as dependency
Next, we can add the Ramses AAR as a dependency in the app-level build.gradle file, like this:
// <root>/app/build.gradle
dependencies
{
    implementation "io.github.bmwcarit:ramses-aar:1.0.3"
}
We also have to disable compression for ramses assets in the app:
android {
    aaptOptions {
        noCompress "ramses", "rlogic"
    }
}
This is needed because Ramses already compresses assets which collides with the Android mechanism for asset compression.
Creating a scene thread
Next, we create a thread class which loads and visualizes the Ramses assets. To do so, we can extend the RamsesThread with our custom logic, we will call it MonkeyThread in this example:
import com.bmwgroup.ramses.RamsesThread

class MonkeyThread(threadName: String, context: Context) :
    RamsesThread(threadName, context) {

    // We will be adding the implementation of these methods a bit later!
    override fun onSceneLoaded() = Unit
    override fun onUpdate() = Unit
    override fun onSceneLoadFailed() = Unit
    override fun onLogicUpdated() = Unit
    override fun onDisplayResize(width: Int, height: Int) = Unit
}
Override all required methods and leave them empty for now, we will be returning back to this code shortly.
Replace the TextView with a SurfaceView in the Activity layout
Replace the default TextView created by Android in our activity layout XML file with a SurfaceView which we will render our monkey into, like this:
    <SurfaceView
        android:id="@+id/surfaceView"
        android:layout_width="0dp"
        android:layout_height="0dp"
        app:layout_constraintBottom_toBottomOf="parent"
        app:layout_constraintEnd_toEndOf="parent"
        app:layout_constraintStart_toStartOf="parent"
        app:layout_constraintTop_toTopOf="parent" />
Ramses supports rendering into a SurfaceView and a TextureView. We are going to be using the former in this example.
Next, we make our activity listen to surface events, so that we can load our asset files after a surface is created, and adapt its size when the surface size is changed. First, implement the SurfaceHolder.Callback interface:
class MainActivity : AppCompatActivity(), SurfaceHolder.Callback {
    // We will implement these later!
    override fun surfaceCreated(holder: SurfaceHolder) = Unit
    override fun surfaceChanged(holder: SurfaceHolder, format: Int, width: Int, height: Int) = Unit
    override fun surfaceDestroyed(holder: SurfaceHolder) = Unit
}
…and register the activity as a listener to surface events in the activity constructor:
val surfaceView = findViewById<SurfaceView>(R.id.surfaceView)
surfaceView.holder.addCallback(this)
If we start the app now, we will only see a black surface - we are still not doing anything meaningful with the surface.
Exporting a binary version of the asset
In order to render something into the SurfaceView, we need an asset exported in binary form from
the RamsesComposer.
There are multiple ways how to do this, the simplest one is to use the export menu (File -> Export).
Open the project we created in the Monkey tutorial and export the files
into the assets/ folder of the app. If you used the standard paths, this is <root>/app/src/main/assets/. You should have the monkey.ramses and monkey.rlogic files
in the assets folder which we will load next.
Loading the assets
Let’s got back to the activity. We can now instantiate the MonkeyThread we created earlier and load the assets into it.
One way to do this is to use the ‘lazy’ initialization mechanism of Kotlin to instantiate the thread, and to initialize it in the onCreate() callback of our activity, like this:
class MainActivity : AppCompatActivity(), SurfaceHolder.Callback {
    private val monkeyThread: MonkeyThread by lazy {
        MonkeyThread("MonkeyThread", applicationContext)
    }

    override fun onCreate(savedInstanceState: Bundle?) {
        super.onCreate(savedInstanceState)
        setContentView(R.layout.activity_main)

        // Loads the binary asset files we exported before using the asset manager
        monkeyThread.initRamsesThreadAndLoadScene(assets, "monkey.ramses", "monkey.rlogic")

        val surfaceView = findViewById<SurfaceView>(R.id.surfaceView)
        surfaceView.holder.addCallback(this)
    }
The app will still build now, but the screen will show black. Why is that so? Because we have loaded the scene in memory, but we are not showing it yet. To show it, we have to tell the RamsesThread that it should create a display and show the scene there. We have to do this once the SurfaceView’s surface has been created. You guessed it! That belongs in the surfaceCreated() callback:
override fun surfaceCreated(holder: SurfaceHolder) {
    // We are working with a thread - we have to catch interrupt exceptions
    try {
        // Creates a display and shows the scene we loaded in onCreate()
        monkeyThread.createDisplayAndShowScene(holder.surface, ClearColor(0F, 0F, 0F, 1F))

        // Start rendering
        monkeyThread.addRunnableToThreadQueue {
            if (monkeyThread.isDisplayCreated && !monkeyThread.isRendering) {
                monkeyThread.startRendering()
            }
        }
    } catch (e: InterruptedException) {
        Log.e("MainActivity", "surfaceCreated failed: ", e)
    }
}
Multiple things going on here. Let’s have a look one by one.
First, we need a try/catch block. Most of the calls to RamsesThread are performed asynchronously and therefore can be interrupted. In a real-world application, our business logic should handle such interruptions gracefully, e.g. by showing something else or displaying a ‘loading screen’ while reloading the content. In this example, we keep things simple and just print the exception stack trace.
Inside the try block, we first create a Ramses display and immediately show the scene we loaded earlier in the thread. Then, we tell the thread to start rendering.
Finally, in the catch block we do a trivial error handling - we log the error and proceed. Needless to say, this is not a true error handling, but we want to keep this example simple. A better way would be to tell the user of the app that there was a problem with the asset.
Notice how we check if a display is created and if the thread is not already rendering, before we ask it to start rendering. The lifecycle-related RamsesThread calls (start/stop rendering, creating displays etc.) are not graceful - i.e. they will throw exceptions if you are doing something which is not well defined, for example starting to render when the thread is already rendering.
Improve the lifecycle
If you are an experienced Android developer, you noticed that we didn’t implement the other two surface callbacks:
surfaceChanged
surfaceDestroyed
The surfaceChanged overload should pass the size information down to your scene thread so that it can adjust itself to the new size (as we do in the next section):
override fun surfaceChanged(holder: SurfaceHolder, format: Int, width: Int, height: Int) {
    monkeyThread.resizeDisplay(width, height)
}
The surfaceDestroyed should destroy the display we created:
override fun surfaceDestroyed(holder: SurfaceHolder) {
    try {
        monkeyThread.destroyDisplay()
    } catch (e: InterruptedException) {
        Log.e("MainActivity", "surfaceDestroyed failed: ", e)
    }
}
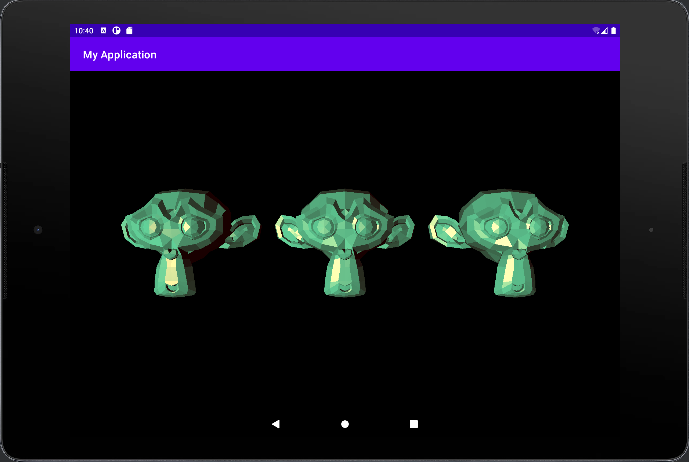
If you start the app now, you should see at least one green monkey! But it doesn’t look quite the same as the Ramses Composer preview… Let’s fix this.
Fix the viewport
Depending on your device/emulator, the monkeys are not centered on the screen, and probably look strange in portrait mode. This is because the monkey asset doesn’t know the size of the display you are showing it on. It uses the camera/viewport settings which were statically set in the Ramses Composer! So you have to configure these properties in the app. It’s time we implement some of the overloaded methods we left empty in our MonkeyThread!
First, we need to obtain and set the properties of the camera used to render the monkeys. You can find the camera object in the node tree of the Composer:
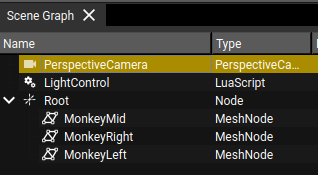
As you can see, the viewport is fixed at 1440x720 pixels. That’s probably not the same as your surface size. We have to find these properties in the asset during runtime and set the values to be the same as the real pixel dimensions of the surface.
One way to find the camera object is by looking it up by name:
val cameraRoot = getLogicNodeRootInput("PerspectiveCamera_CameraBinding")
The name is a combination of the name in the RamsesComposer project (‘PerspectiveCamera’ in this case) and the binding used to control its properties (a ‘CameraBinding’ in this case). For more information on the available objects exported by the Ramses Composer, see this page.
You can also find a list of all exported objects and their names in the export menu of the Ramses Composer (File -> Export).
Next, we want to store the properties of the camera viewport in our MonkeyThread so that we can set them to their correct value later:
private var viewportWidth: Property? = null
private var viewportHeight: Property? = null
private var aspectRatio: Property? = null

override fun onSceneLoaded() {
    val cameraRoot = getLogicNodeRootInput("PerspectiveCamera_CameraBinding")

    viewportWidth = cameraRoot?.getChild("viewport")?.getChild("width")
    viewportHeight = cameraRoot?.getChild("viewport")?.getChild("height")
    aspectRatio = cameraRoot?.getChild("frustum")?.getChild("aspectRatio")
}
Each logic object in the scene has nested list of properties, which you can obtain either by iterating with getChildCount()/getChild(int) or by querying by their name, as we do in the snippet above.
But how do we know the names of these properties? In this example, the object we query is a
CameraBinding - one of
the standard objects provided by Ramses Logic to interact with a Ramses scene. As such, the object has
a fixed list of properties, which are documented in the
CameraBinding documentation.
You can find a list of all such binding objects in the
binding documentation -
it lists all the subclass which bind Ramses objects.
Now, we have a handle of the camera properties. All that remains to be done is to set their values based on the surface size and orientation. We do this in the onDisplayResize() callback of the MonkeyThread:
override fun onDisplayResize(width: Int, height: Int) {
    viewportWidth?.set(width)
    viewportHeight?.set(height)
    aspectRatio?.set(width.toFloat() / height)
}
Voila! The monkeys will now look undistorted and centered on the screen, regardless of its size and orientation.
Doing more interesting things
What we did in the previous sections is configure the monkey asset to look correctly based on screen size. We can make the app a bit more interesting by using some of the features we implemented in the monkeys tutorial - for example controlling the lights. We can control any property of the scene either per frame, or when specific events occur (touch gestures, sensors etc.). For example, we can switch the light direction every two seconds like this:
private var lightId: Property? = null
private var frame = 0


override fun onSceneLoaded() {
    // ...

    lightId = getLogicNodeRootInput("LightControl")?.getChild("light_id")
}

override fun onUpdate() {
    lightId?.set((frame / 60) % 3)
    frame += 1
}
We simply count the frames, and every 60th frame we toggle the light id by one (and restart from 0 when we reach 3). For a more complex example with touch gestures, please see a more sophisticated example.
See a more complex app example
This tutorial is designed to be small in code and relatively simple. For a more complex example, both in terms of graphics and in terms of control, please check out the Digital car app.