Offscreen rendering example
You can find the example project here.

This example shows how to perform offscreen rendering with the Ramses Composer (also called render-to-texture). Following concepts will be explained:
RenderBuffers
RenderTargets
Combining RenderTargets, -Layers, -Passes and tags to produce an offscreen effect
This example is similar to the monkey example, but instead of rendering to the display buffer, it renders to a texture first and then shows the texture contents on a slightly rotated quad. We recommend having a look at the ordering example to understand how to structure a scene in different parts which are rendered at different times - this technique is a requirement for offscreen rendering.
Let’s have a look at the contents of the project.
Scene graph and resources
After opening the project, we notice a few more things compared to the monkey example.
To keep this example simple, we render a single monkey head without a script. In the Scene View, there are two cameras - one for rendering the monkey and one for rendering the quad:

Furthermore, there are a bunch of new objects in the Resource View:

These new objects define how the offscreen rendering should work, i.e. which objects are rendered to which buffer at which time.
Let’s start with the RenderLayers. We need two such layers - one for the monkey, one for the quad.
Each of them uses a different tag to filter their content - monkey and quad respectively.
Here is how the RenderLayer of the monkey looks like (it uses a monkey tag to collect the monkey mesh):

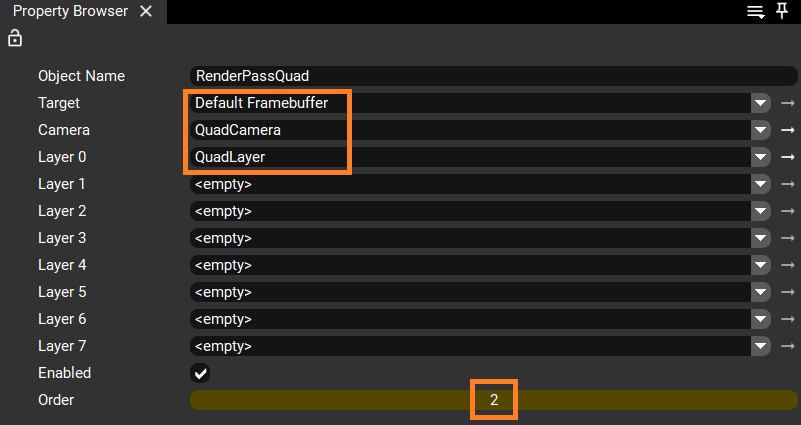
Next, we have two RenderPasses, one for each RenderLayer. The RenderPass which renders the monkey
uses an offscreen RenderTarget, while the one of the quad renders to the framebuffer:

Note that the RenderPass of the monkey also clears its RenderTarget, and uses a clear color.
In Ramses, the framebuffer
settings are not managed by the scene, but is rather a global setting of the display where the scene is being shown.
RenderTargets belong to the scene, and therefore must be explicitly cleared.
Let’s have a look at the RenderTarget:

The RenderTarget (in OpenGL terms - a framebuffer object, or FBO)
is a collection of one or multiple buffers for rendering.
Those can be color buffers, and optionally a depth and/or stencil buffer. These buffers must all have the same size, and must
fulfill other criteria too - e.g. you can have at most one depth buffer, and they can’t exceed a given size. The Ramses Composer
will report errors in the configuration of the RenderTarget if such are found. Note that the FBO configuration is a hardware
detail - not all formats work on all hardware devices. Some devices have a limit on e.g. how many floating point textures can
be created, and not all devices support 16 or 32 bit float channels. Be careful which formats you really need and cross-check
with your target hardware!
In this example, we have two such buffers - one for color, and one for depth information. Note that they have a size which is different than the framebuffer, and have a format (RGBA8 and Depth24 respectively):


Note: the size of the framebuffer can be configured in View->Project Settings (Display Size). These settings affect the preview window, but are not exported in the scene.
In addition, the color buffer has sampling settings which define how it will be read.
Now, if we look at the material of the quad, we notice that the two buffers (color and depth) are mapped to its texture slots:

The material can therefore read the data from the buffers. If you look at the fragment shader. you will notice that it displays the color buffer based on texture coordinates. This produces the final image which shows a flat texture with the monkey head.
A note on performance
Offscreen rendering is a powerful feature used for many things - antialiasing, filtering, other kinds of postprocessing, shadows etc. It’s tempting to use it for all kinds of global effects, but it also costs a lot of memory and/or runtime. Overusing such effects often causes sampling stalls on the GPU, especially when reading/writing multiple textures as in this example. A good technical artist knows when to use and when not to use offscreen rendering.
Recreate this sample
This example is created in a way similar to the monkey example. We only highlight the steps specific to this example here:
Create a new project and delete the default content
Create a standard “Suzanne” monkey (same as in monkey example)
You can also just copy the project and delete two of the monkey heads
Remember to change all the color values in the material uniforms, otherwise the monkey is black on a black background
Create the Quad
Create a standard “Plane” mesh in Blender and export as glTF (quad.gltf)
Make sure to export the texture coordinates!
Create a Quad Mesh resource and set the quad.gltf file as a source for its data
Create a Quad Material from the
resolveGLSL shaders. Leave the uniforms unset for nowLink the Quad MeshNode to the Quad Mesh and Quad Material from above
Create a node for the Quad and attach it under the root node
Create the MonkeyRenderTarget
Create a render target and two render buffers (color and depth)
Set the resolution and buffer types (e.g. 512x256, RGBA8 and Depth24) - you can try other types too!
Attach the buffers to the RenderTarget in its property panel
Create the cameras
Create two cameras - MonkeyCamera and QuadCamera
Set the viewport of the MonkeyCamera to the same resolution as the size of the buffers in the render target above
Create the Monkey RenderLayer and Pass
Create a MonkeyRenderLayer with a render tag “monkey”
Create a MonkeyRenderPass and set the MonkeyRenderLayer to its first slot
Set the render order of the MonkeyRenderPass to 1 (it will be rendered first)
Set the Clear Color of the RenderPass to some color
Set tag “monkey” to the Monkey MeshNode in the scene graph
Set the MonkeyRenderTarget from above as target of the MonkeyRenderPass
Set the MonkeyCamera in the MonkeyRenderPass
Create the Quad RenderLayer and Pass
Create a QuadRenderLayer with a render tag “quad”
Create a QuadRenderPass and set the QuadRenderLayer to its first slot
Set the render order of the QuadRenderPass to 2 (it will be rendered second)
Set tag “quad” to the Quad Mesh
Set the QuadCamera in the QuadRenderPass
Use the RT buffers in the Quad material (color and depth)