‘Hello world’ cube example
You can find the example code here.

This example shows how Blender and RaCo can be used to produce a trivial unlit cube scene.
Contents explained
Let’s start by examining the sample project. You can re-create the sample yourself later. Start the composer and open the cube.rca file (File->Open). You will see the image from above, along with a few views, among which the scene graph view and the resources view.
Scene graph
The scene graph of the cube consists of a node (with a child MeshNode) and a camera:
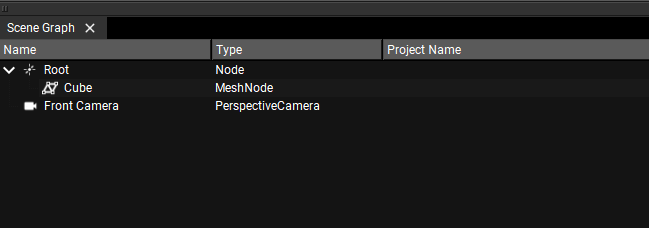
The scene graph view shows all elements in the scene. In the left column, you can inspect the names and structure of the nodes/meshes/cameras etc., while in the ‘Type’ column you can see the type of the object. Nodes generally keep only positional data, MeshNodes carry mesh information and settings. MeshNodes correspond to draw calls in OpenGL terminology.
The Camera is a special object which affects the entire SceneGraph by defining the view space of it. The standard camera in the Ramses Composer is facing towards the negative Z axis, and has the positive Y axis as “UP”. This corresponds to OpenGL “defaults” from earlier times before programmable shaders, and also to the default glTF 2.0 convention.
You can click and inspect each element’s properties in the Property panel. You will notice that the Root node has rotation values which affect the position of the child Cube when changed. You can also notice that the MeshNode has links to Resources in its property view:

Notice the arrow icons right of the resource selector. Clicking the arrow will automatically select the corresponding Resource object.
Which leads us to the next data view: the resources.
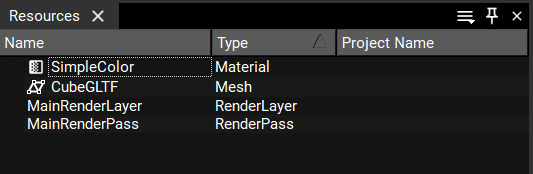
Resources
Resources are data objects which can be reused throughout the scene graph. Think of them as immutable objects which are composed out of external data. For example, a Mesh resource represents a named mesh which is imported from a glTF 2.0 file:

See the section further down for details how to create/export glTF 2.0 files.
Note: if you are new to the GLTF 2.0 format, have a look at the docs.
You can modify the path of the mesh to a different glTF file, and the mesh will update itself. It also monitors the glTF file it currently refers to for changes, and “hot-reloads” itself when the file is changed.
Another type of resource is the Material. A Material points to GLSL files which hold the source code for its shaders. Changing the URI of the shader files, or the files themselves, will immediately update the state of the Material resource, and all MeshNodes which refer to it. Try and modify the color in the fragment shader file and observe the results. If you are familiar with shaders, but new to GLSL, you can find the quick reference of the OpenGL ES 3.0 flavor here - this is the base version of GLSL typically used by modern consumer electronics.
There are two more resource types in the default project - a RenderLayer and a RenderPass. Please
refer to the tutorial related to ordering for details on their usage. In the context
of this tutorial, it’s enough to know that they make sure the cube is shown in the viewport of the Ramses Composer.
Saving the project
You can save the project with your changes, or save as a different file. Note that the Composer stores relative paths - so when saving to a different place on disk, the new_cube.rca file will re-calculate the relative file paths to its external resources. This will notably not work with network drives!
Export glTF from Blender
The Composer is not a designer tool - it can’t be used to create meshes or images, instead it only composes them to a project ready to be used by an application. The cube in this example is a 3D mesh, despite being a simple one. You can create it very easily with Blender - it has the cube as its default scene.
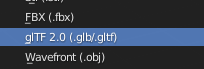
You can export a glTF 2.0 file from Blender over the File->Export->glTF 2.0 menu:
You can leave the settings unchanged, but we highly recommend using the text form of glTF 2.0, as the Blender tooltip conveniently mentions:
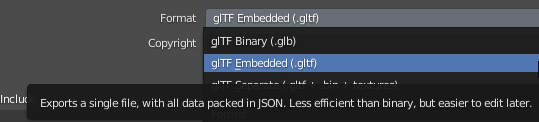
We also suggest disabling parts which are not required, to keep the asset small. In this example, we can disable all geometry properties (we don’t use any), and all animation properties.
Recreate cube sample
To recreate the sample cube project from scratch, follow these steps:
Export the default cube from blender (as glTF 2.0) as described in the section above
Create a new project in Ramses Composer
Delete the default cube in Ramses Composer (in the Scene Graph view)
Select the default Node and press ‘delete’
Create a new MeshNode in the Scene Graph view
Right click -> Create MeshNode
Give it a name (optionally) in the Property Browser
Apply the tag render_main in the Property Browser
Create a new Mesh in the resources window
Right click -> Create Mesh
Give it a name (optionally)
In the URI field (Property Browser) select the path to the glTF file exported by Blender
Click the MeshNode in the scene graph and point it to the newly added Mesh resource (select mesh via drop down in property browser)
Create a new Material in the resources window
Right click -> Create Material
Give it a name (optionally)
Assign it shaders by clicking on the “…” button (this example uses trivial single-color flat shaders)
Optionally set default values to its uniforms
Click the MeshNode in the scene graph and point it to the newly added Material (select material via drop down in property browser)
Save the project (File -> Save)