External References
You can find the example project here.
External references provide the ability to use Prefabs and resources from one project file in another. This can be used to structure your projects, share and re-use parts of scenes or create library projects. The most important applications are to utilize a version control system and to allow multiple people to work on different parts of a complex project at the same time without running into conflicts.
This example will use our previous Prefab example scenes as well as one additional project and combine everything into a master street scene. You should already be familiar with these basic and advanced Prefab examples.
The Concept
External References are a very powerful feature. They have the power to make your life much easier - or much harder if used in the wrong way. So it is important to understand how they work and spend some thought on how to set up a complex project with multiple scene files.
Prefabs allow you to structure your project and re-use components. While this works nicely to build up quite complex scenes in a single project file, only one person can work on the scene at the same time. This is where External References come into play. You can create a Prefab in one scene and then re-use it in other scenes. If you do so as an External Reference rather than a simple copy, then all changes to the Prefab in the source scene can be propagated automatically to the scenes using it. An External Reference Prefab is not editable and brings in all resources it requires, also as External References.
Besides complete Prefabs, you can also use resources as External References directly. This is useful for creating e.g. a materials library to be used by multiple scenes.
To summarize, External References work with
Prefabs
Materials
Textures
Meshes
Scripts
Only scene files which have been created independently from the consumer scene may be used as a source scene for external reference objects.
Independently created scenes are only those that are created by File/New followed by File/Save, or by File/Save As with new IDs. Scenes files created using either File/SaveAs from within RamsesComposer or by using OS file copy operations do not count as independently created and can not be used as source of external reference objects.
Hint: use File/Save As with new IDs when saving a copy of a project intended to be used as an external reference from original project or as external reference more than once. File/Save As with new IDs command regenerates all project items’ object IDs to be new unique values, making them being created independently. This allows to reference objects from the project copy at the same time as using original project without conflicts. Otherwise you can not reference an object more that once due to conflicting IDs.
This allows you to split up your project into multiple modules with their own scene files and put them into a version control system as separate entities. This works very much like you would handle software modules or libraries in software development. This way you can
use version control to select which version of a module scene you want to use and when you want to switch to a different version
work with multiple people on the same overall scene. Each module can be edited by exactly one person, the results can then be exchanged via the version control system and External References will be updated automatically.
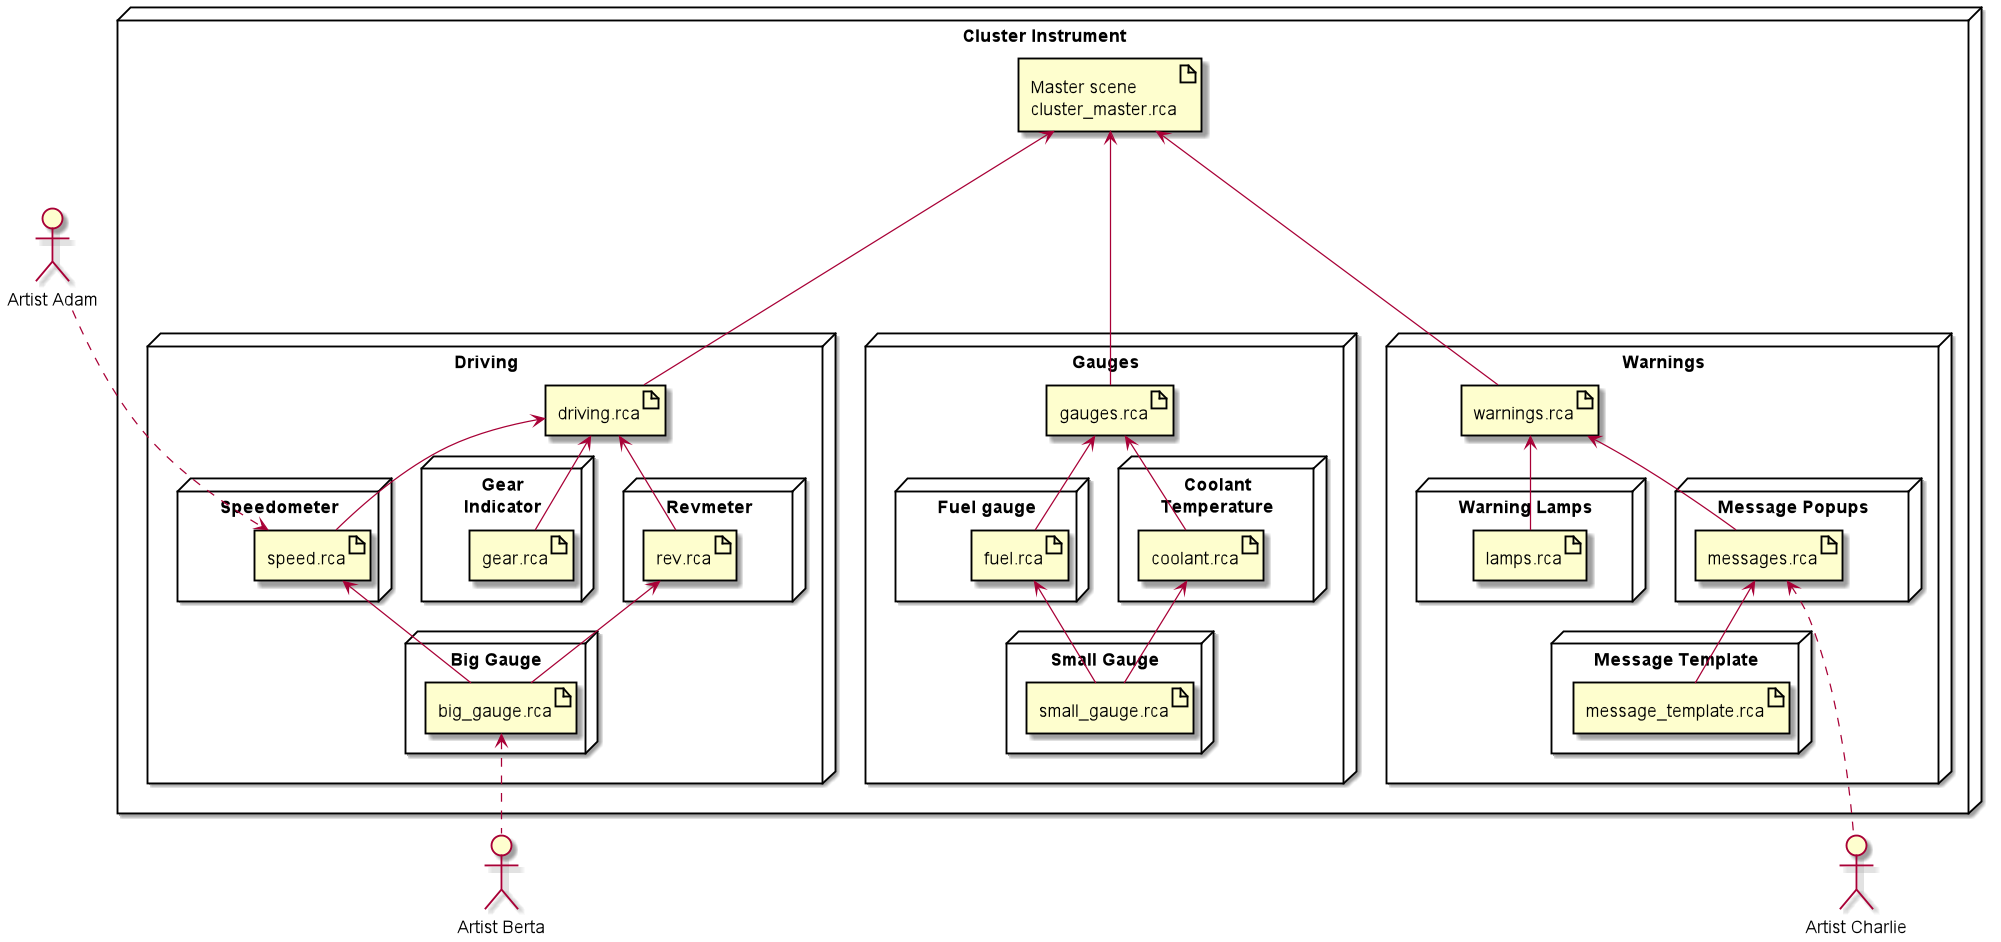
This diagram shows how a possible structure for a rather complex classic cluster instrument scene might look. Every module in the diagram would be a separate entity in the version control system. The arrows represent usage of external references. The master scene would just assemble the main modules and contain little to no content of its own. With such a setup, every module scene can be worked on in parallel.
This setup would fit a rather complex scene with the need to work on many of the parts simultaneously and dynamically assign responsibilities. For a simpler setup with a small team it might also be sufficient to just create three separate modules in version control for the three main groups.
Update Timing
The following diagram shows a more detailed view of two scenes, one providing a Prefab to the other as an External Reference. Both scenes are located in the same file system. This means that the resources in both the source scene and the consumer scene have the same URIs and share the same files.
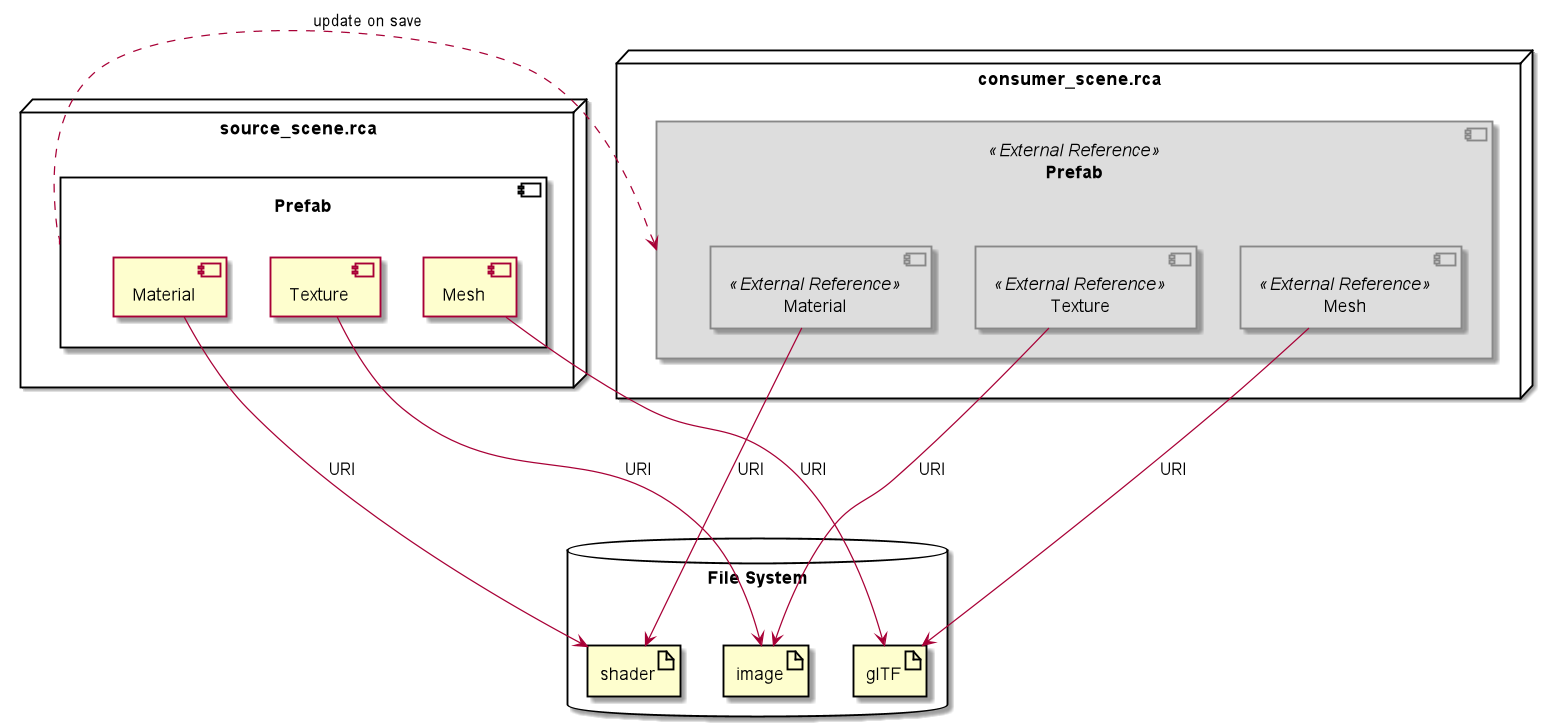
The External Reference in the consumer scene is updated every time the source scene is saved. However, changes to the resource files like updating an image file or editing a shader become effective immediately because the files are shared. Breaking changes like a different set of uniforms in a shader might temporarily break the consumer scene and make objects look strange or disappear in the preview, until you have completed the change in the source scene and saved it. It might also be necessary to do some work in the consumer scene to properly connect the new version of the updated Prefab if the interface has changed.
This is perfectly ok if you are responsible for both scenes and you are aware of what you are changing and when you will reach a stable state again. Just like you would do changes to your scene in a single project file.
But you should never ever include other people’s work with an External Reference using direct file access like a shared network drive. Changes to those source projects will affect your scene immediately - and Murphy’s Law says that this will most likely happen right before you need to deliver an important milestone or in the middle of a VIP demonstration.
Always use a version control system to exchange scene files, so you can decide which version of other scenes you want to use and when you are ready to pull an update into your scene.
Using External Resources
But enough of the theory, let’s start building a nice street scene. First have a look at the included simple_road.rca file. This very basic scene contains a plane with a texture showing road markings. We want to use this road in our combined scene. Note that it does not contain a Prefab, so we will use the resources from this scene directly, like from some sort of library.
We start with a new and empty scene. To bring in content from other scenes there are two options.
To work with multiple projects, you can start another instance of Ramses Composer and load a different scene. You can then switch between the Ramses Composer instances and use copy and paste to move data between the projects.
A more convenient way is to use the Project Browser. The Project Browser is a window that allows you to load the contents of multiple other scene files simultaneously, inspect them and create copies or external references from their contents. We will use this approach here.
Project Browser
The Project Browser is not visible by default. You can open it from the Menu by selecting View/New Project Browser. Right-click inside the Window, select Add Project… and in the file browser navigate to simple_road.rca. You can repeat this step to bring in more projects and inspect them simultaneously.
The Project Browser is a utility for pulling in objects. The projects which provide External References for the current scene will remain present in the Project Browser as long as these references exist. Their file name line is also shown in a different color to indicate they belong to a different project. Other projects which you just inspected or used for extracting copies from are not saved and will be gone in the next session.
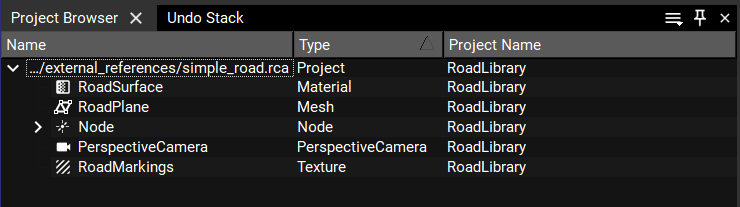
Here we see all the contents of the projects. Note that the names of the projects we are inspecting are shown in the third column for all objects. It is important to have meaningful names in all your projects in order to track the source where the external references are coming from and where you can edit them if you need to make changes.
The object name of the Project Settings is used as the project name. The project settings are accessible using the View/Project Settings entry from the Menu.
Now we want to bring in the RoadSurface material. Right-click on it and select Copy. Then right-click in the resources window. Paste would create a simple copy without updates, but we don’t want that. Select Paste as External Reference. The material will appear as a resource. It is shown in green color to indicate that it is an External Reference. It cannot be edited here, but you can select it and inspect all its properties. The third column indicates the project name where it is coming from.
Alternatively to copy-pasting, you can also drag & drop the external item into the resource view. If you hold down the Alt-key as you let go, the item will be pasted as external reference.
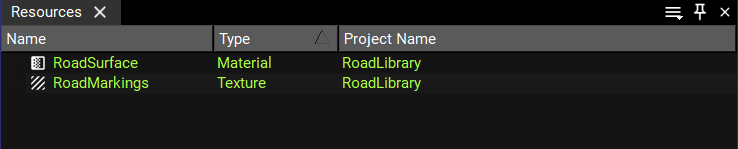
Note that the texture RoadMarkings has also magically appeared in the Resources View. When you create External References, all resources the referenced object directly or indirectly requires are automatically also added as External References. When you are including a complex Prefab, it can bring along quite a large number of resources. It is therefore helpful to give meaningful names to the objects in your scenes. Ramses Composer will not get confused by resources with default or non-descriptive names (it tracks them using a unique object ID), but you and your colleagues might.
We are still missing the mesh RoadPlane. Copy it from the Project Browser and Paste as External Reference again.
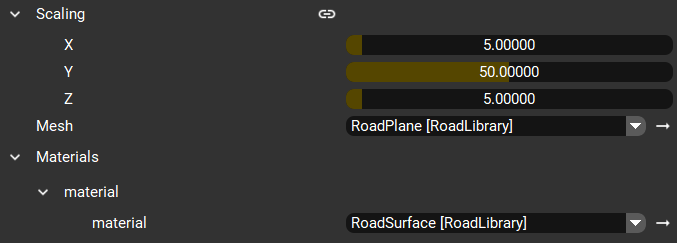
Now we build our scene using the imported resources. Add a Node and a MeshNode as its child. Assign the imported material and mesh to the MeshNode. You should see a distorted piece of road in the Preview. Adjust the scaling as shown in the picture to match the scale of the other objects we are going to import shortly. Finally, rotate the Node -90° on the X-axis, this should put the road flat on the ground where it belongs. Now you can’t see anything because the street goes straight through the camera. In order to fix this, move the camera 5° up on the y-axis and rotate it -25° on the x-axis.
Note that mesh and material drop-down boxes show the project name after the resource name for External References. This is true for all reference properties to external objects, to help you keep track of where your resources are coming from and better distinguish them if they should have similar names.
Using External Prefabs
Let’s go back to the Project Browser and add the project file from the Prefab example. You should find it at ../prefabs/lantern_road.rca. Locate the Prefab Lantern_Prefab, copy it and paste it in the Prefabs View as an External Reference. Now you can use the Prefab just like any other Prefab in your scene. Note that it also brought in one material, three meshes and two textures which have appeared in the resource window.
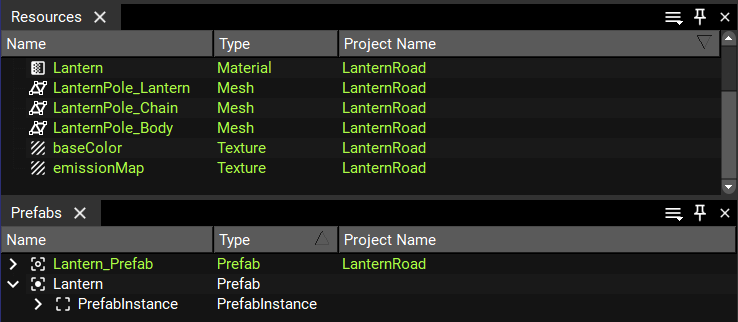
If we add a Prefab Instance of the lantern now, it becomes apparent that the different scenes were not designed to be used together and the objects have widely differing scales. We need to scale down the lantern, but we can’t edit the imported Prefab itself as it is an External Reference. Of course we could just scale every individual instance, but as we are lazy, we rather create a new Prefab named Lantern and add a Prefab Instance for our Lantern_Prefab inside. Now we can scale the Prefab Instance to 0.15 in all dimensions to match our scene. Let’s add six Prefab Instances of our local Lantern Prefab to your scene and position them to the left and right of the road.
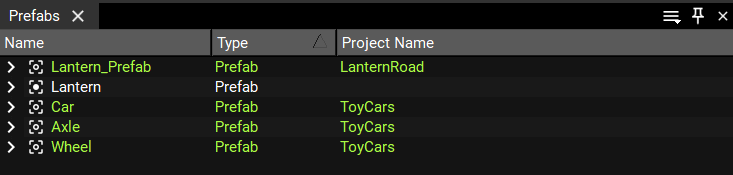
Finally we need some cars on our road. Go to the Project Browser again, add the project file from the nested prefab example at ../nested_prefabs/toy_cars.rca and bring in the Prefabs Car and SUV as External References. You know the procedure by now. Note that when you paste the Car Prefab, it also brings in the Prefabs Axle and Wheel that it requires. When you add the SUV, there are no automatic additions here, as the two required Prefabs are already present.

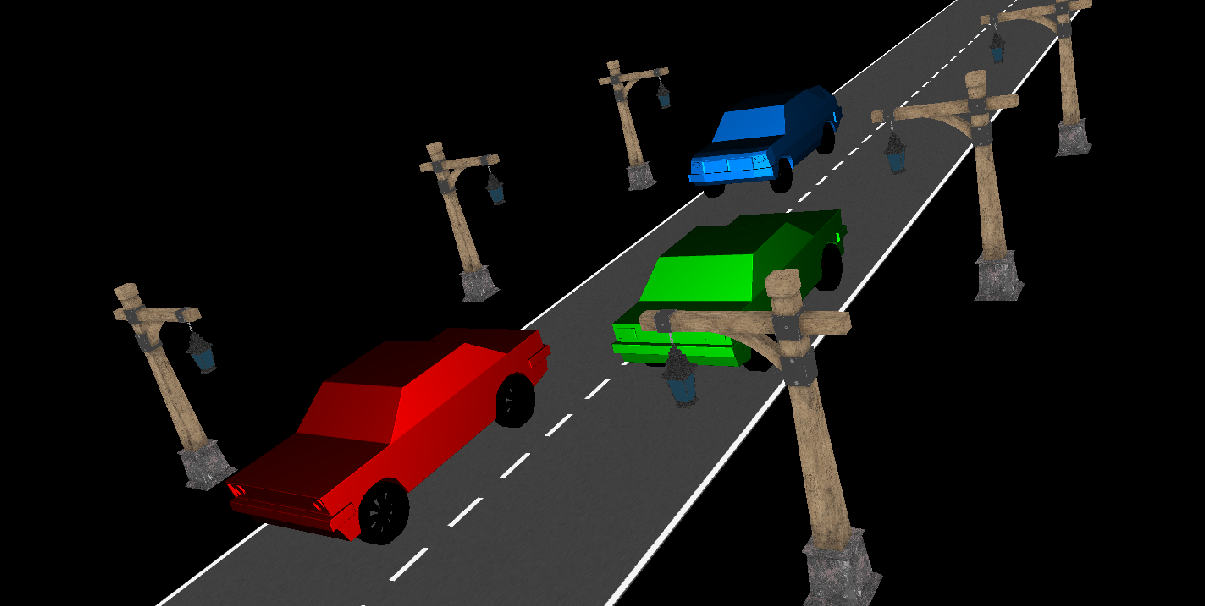
Make as many Prefab Instances for cars and SUVs as you feel like and position them on the road. For a real life project we would probably add some links now to connect the Prefab Instance to the surrounding scene. As this example focuses on the External Reference mechanism we don’t have dynamic functionality in the scene. After some fiddling with positions and camera settings, your scene might look similar to this.
Editing and Updating
Let’s play through one update cycle of External References. Let’s assume we are not happy with all the cars being plain gray. In order to change this, we need to change the ToyCars project. Keep your current project open and start a second instance of Ramses Composer to edit ../nested_prefabs/toy_cars.rca.
Select plainMaterial in the Resource View and edit the fragment shader. In line 8 you find a constant defintion for the color. Change it into a uniform like this:
#define brightnes 1.0
uniform vec3 color;
uniform float opacity;
Save the shader code and look at your main scene. You will observe that all cars have turned black. This is because both the source scene and the receiving scene now share the same shader file and our change to the shader was immediately noticed and incorporated in the main scene as well. As we are in control of both scenes and know what we’re doing, this is ok and we just proceed.
Now the material can handle color, but our Prefabs do not allow access to it yet, so we need to edit their interface script. Open the Car Prefab in the Prefab View and edit the vehicleControl LUA script.
function interface(IN,OUT)
	IN.wheelFactor = Type:Float()
	IN.steeringFactor = Type:Float()
	IN.color = Type:Vec3f()

	OUT.rotationAngle = Type:Float()
	OUT.steeringAngle = Type:Float()
	OUT.color = Type:Vec3f()
end

function run(IN,OUT)
    OUT.rotationAngle = IN.wheelFactor * 360
    OUT.steeringAngle = IN.steeringFactor * 90
	OUT.color = IN.color
end
Add a new input parameter and a new output parameter color as shown above. In the run() function, just assign the input color to the output color.
In order for the LUA script and LUA interface to work together, you need to add a line for the parameter color in the interface, as well.
function interface(INOUT)
    INOUT.steeringFactor = Type:Float()
    INOUT.wheelFactor = Type:Float()
    INOUT.color = Type:Vec3f()
end
Finally, select the MeshNode ToyCar and create a link on its color property from the output parameter of the script. Now we can set the color of the cars from outside the Prefab. Also create this link in the SUV Prefab. As it shares the material and the interface script with the Car prefab, the uniform and the script parameters are in place already.
Save the ToyCar scene and switch over to your main scene. You will find that the Prefabs and Prefab Instances for the toy cars have been updated automatically. Select the vehicleControl script in your prefab instances, you will find the new color parameter there. Use it to give some personal touch to the scene.
Removing External References
You can remove External References from a project if you no longer need them. In fact, you should continuously make sure that you don’t have surplus objects in your project. Unused Prefabs are not a big problem - they clutter up the Prefab view but are not included in the scene graph. Still, unused resources will unnecessarily increase the size of your exported RAMSES file.
To remove an External Prefab, simply delete it from the Prefab View. As long as an external object is still required by another External Reference, you can’t delete it - the Delete menu item will be disabled. Note that only objects required by other External References are protected this way. Prefabs and resources that are actively used in the scene graph can be deleted any time, this will just invalidate the corresponding references in the scene graph.
Likewise, you can delete resources manually. But Ramses Composer can do this for you and detect and delete all resources currently not used by any other objects can be automatically. Select Delete Unused Resources from the context menu in the Resources view. This will apply to both External References and normal resource objects. It is a good idea to save your scene beforehand, just in case more things disappear than expected.
Splitting existing Projects into Modules
To split an existing scene into multiple modules and integrate them into the original master scene using external references the following approximate workflow can be used:
Prefab conversion: create Prefabs for the parts of the scenegraph that should be placed into a module scene.
Creating module scene: Deep cut the Prefabs and paste them into a newly created scene for the module. An easy way to do this is to use multiple RamsesComposer instances. When pasting into the module scene, use normal paste and not
paste as external reference.Use module in master scene: add the newly created module scene to the Projects Browser, copy the Prefabs from there and paste them into the master scene as external references. Set the template of prefab instances to the pasted prefabs.
The deep cut operation of the Prefab will include all resources that are used by the Prefab and is needed to ensure that the module scene will contain the prefab with all its dependencies.
Moving Project Files
External References store a relative path to the scene files they originate from. As long as you move around all scenes as a whole set of folders and don’t change file names, those paths will remain valid and things will just keep working. But if you want to do a major restructuring, the need might arise to change some of those paths or filenames - and you probably want to achieve this without breaking and manually reworking your whole scene.
Just moving or renaming referenced project files will invalidate the paths, you will see an error message and the project file will no longer load. The error message displays the path where the missing project file was expected, so it gives you a hint where to start looking for the problem.
Currently there is no mechanism in the user interface to modify or repair the External Reference paths. However, you can use a plain text editor to adjust them manually in the JSON code of the consumer scene file.
    "externalProjects": {
        "66fd51fd-9249-4b31-adab-c20326bb92de": {
            "name": "RoadLibrary",
            "path": "simple_road.rca"
        },
        "6da3a2c4-fbc7-4bff-a256-b013bce0a24e": {
            "name": "ToyCars",
            "path": "../nested_prefabs/toy_cars.rca"
        },
        "99d3d950-ec4b-47fe-bc86-a062059faf3a": {
            "name": "LanternRoad",
            "path": "../prefabs/lantern_road.rca"
        }
At the very beginning of the scene file you will find the list of external projects, similar to the above section from our demo scene. In general it is discouraged to play around in the scene file, but it is safe to edit the existing path entries here as long as you make sure to use valid paths to the correct scene files.