Complex glTF import
You can find the example project here.
![]()
In the previous examples, we always used individual meshes and created each MeshNode by hand. The glTF format (and the RamsesComposer) supports the import of entire scene graphs with multiple meshes, nodes, and their relationship and transformation data. This feature is very powerful and allows the transfer of larger scenes, but has a few caveats we will investigate in this example project.
A general note on glTF data structures and exporters
In order to implement a robust asset pipeline based on glTF and the Ramses Composer, it is important to understand how glTF works first. Read this section carefully!
According to the glTF 2.0 specification all objects in a glTF asset file are stored as JSON arrays.
They are uniquely identified by their index in the array (0, 1, … N), not by their name. This rule applies
to nodes, meshes, and all other kinds of array-based objects. This way of ordering is very efficient and
robust, but it does not allow tracking of objects across different versions of the same file when objects’
indices have changed. It may look intuitive that objects with the same name should
be possible to track, but the glTF format does not mandate unique names, and something having the
same name is still not enough to re-import files robustly.
The RamsesComposer supports hot reloading of referenced files - including glTF assets. This means that overwriting a glTF file will immediately trigger a reload of the Ramses Composer resources which refer to it. In particular, re-exporting the same glTF asset twice, but reordering all objects in their corresponding arrays differently, will have very unexpected results - as we will demonstrate in this example further down.
The Blender glTF exporter produces deterministic ordering after every export, provided the scene did not change topologically (no new or deleted meshes). Other exporters may not be that predictable! In order to avoid export issues we suggest one of the following solutions:
Export meshes to separate glTF files, using the export only selected feature of the Blender glTF exporter. You can create a Blender plugin to do that easily
Don’t import multi-object glTF files which are changing frequently, e.g. during prototyping.
Use the complex glTF import of the Ramses Composer.
You can combine any of these solutions together with the Python API of the Composer to customize the import of data.
Scene graph and resources
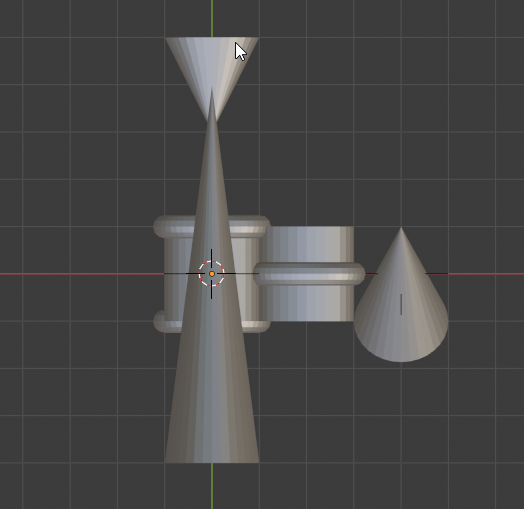
This example project contains a complex scene consisting of multiple meshes and nodes. You can inspect the Blender scene we used. It contains a bunch of named shapes with a different position, orientation and scaling:
To make it easier to match objects after the import, the naming convention for all objects looks like this:
Cylinder/TX+2 (a cylinder object which is translated along the X axis by 2 units in the positive direction)
Cone/TY+5/RX-90 (a cone which is translated along Y by +5 units, and rotated around X by -90 degrees)
Meshes have a ‘Mesh’ suffix in the name, Materials have a ‘Mat_’ prefix
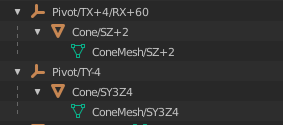
There are also a few Pivot objects which don’t have mesh data of their own, but only serve as local
coordinate systems for their children:
We want to import the Blender contents into the Ramses Composer and keep the original node structure. In
the Hello World and the Monkey examples we learned
how to import single meshes. The monkeys example creates three instances of a mesh, but the
referenced glTF file still contains only one mesh. For more complex scenes, especially such that contain
multiple nodes arranged hierarchically, it’s not
convenient to import these one by one. The Ramses Composer supports the import of an entire scene graph
over the Import GLTF Assets function, which is available
via right click on any node in the Scene Graph view. See the
details section on glTF import for more details.
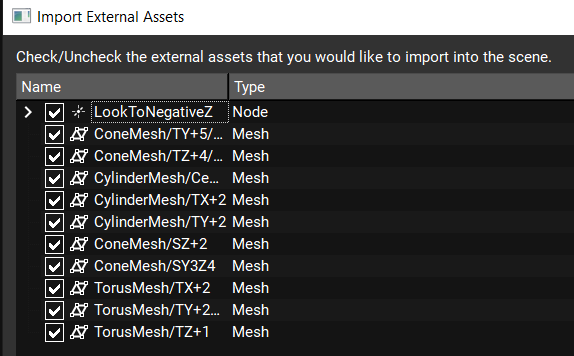
In this example we will import all content from the structure.gltf file which was
exported from Blender:
After the import is finished, the result looks something like this:

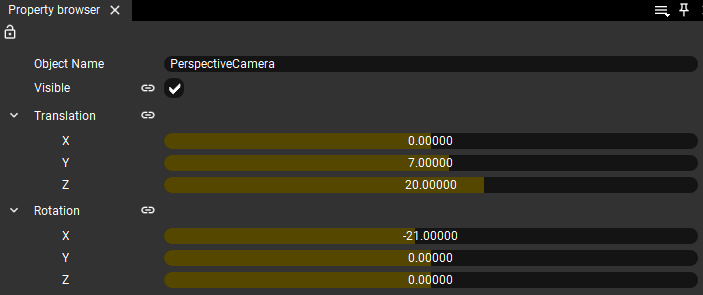
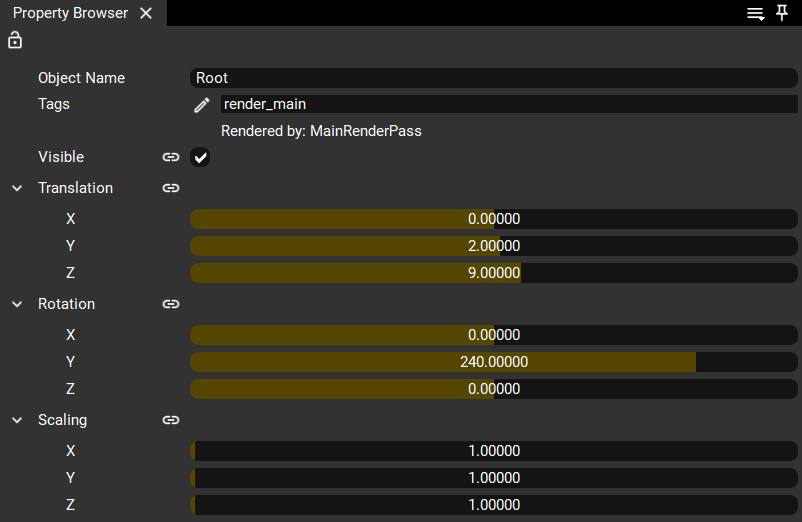
You must adapt the default camera parameters to have a better view of the scene:
Adapt the root node too:
Since this example uses transparent objects which are order-dependent, you need a deterministic
order to ensure consistent rendering. Select the MainRenderLayer object in the Resources
menu and choose the option Scene graph order in the Render Order field:

You can read more on the topic of rendering order in its dedicated tutorial.
The import function puts all imported nodes inside a new root node with name equal to the name of the glTF file:
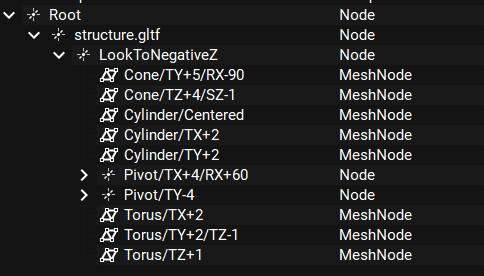
You can observe that the Composer imported the nodes exactly as they were
defined in the Blender sceneand kept their names and parental information. If you un-selected the +Y is up option in
Blender glTF export menu, then the node properties (rotation, translation, scaling) are also exactly the same as in Blender. You can
read up more on the subject in the section in the Conventions chapter.
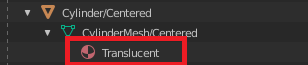
Next, we will modify some of the export/import settings. But first, let’s make all meshes translucent by assigning a translucent material with a different color per mesh, and setting the blending to additive. We use simple shaders which just assign a 4-component color, set alpha values lower than 1.0, and disable the depth buffer:
![]()
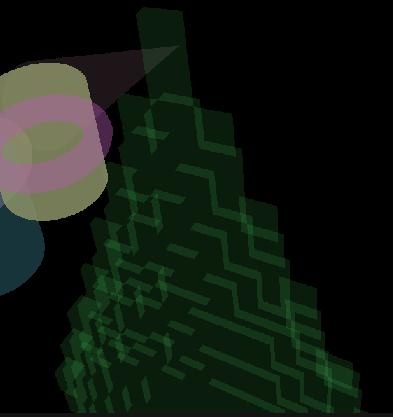
After you do this for all MeshNodes and use different color values, the scene starts to look like this:
![]()
Make sure to create separate Material instances for each MeshNode, and assign them separately. This way we can update the geometry in the glTF file without losing the link to the Materials.
With this scene setup, we can now change the source graphics and/or the import settings of the Composer and observe the changes through the semi-transparent objects.
Let’s inspect the properties of the imported Mesh resources. If you click through them individually, you can observe that they don’t have the “Bake all meshes” option selected like in previous examples, but instead remember their original index from the imported glTF file:

For comparison, this is how the mesh settings from the Monkey example look like:

The default state of a Mesh resource newly created from the context menu is to “bake all meshes” from a glTF file together to form a single mesh.
This also bakes the node hierarchy and all transformations from the glTF file. This is what happened when we imported the monkey head. It didn’t make a difference for the monkey, because the glTF file
contains only one mesh - the monkey head, and baking has no effect. When we used the Import glTF Assets function, the import
didn’t bake objects together, but instead kept them separate, while remembering the index of the original mesh
resource from the referenced glTF file for each of the imported meshes.
Let’s do some experiments!
Experiment one: Playing with the mesh index
Select one of the Mesh resources and change its index property, e.g. set the index of TorusMesh/TZ+1
from 9 to 6. The torus will immediately transform to a cone! But why? If you inspect the mesh index
of ConeMesh/SY3Z4 you will see it is also 6. That’s the mesh of one of the cone objects! You just told the
Torus mesh to use the mesh geometry from the Cone object.
In a real-world project, you wouldn’t want to change the mesh indices manually for an imported mesh. This experiment was meant to show how the link between imported objects towards external glTF files works - based on their index.
Different exporters work differently - be mindful of your asset pipeline and how you export and manage your meshes!
Experiment two: Modifying the source content
Let’s change the original Blender scene and re-export the glTF file. This is what glTF is made for - let’s make the most of it!
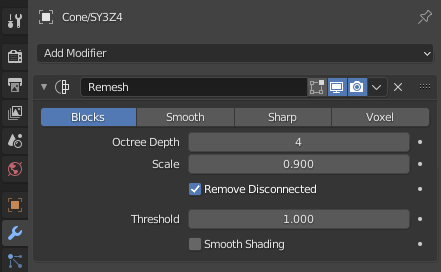
Open the Blender scene and use e.g. the Remesh modifier on the Cone/SY3Z4 object through the modifiers toolbar:

E.g. using the blocks type with following settings:
The largest cone transforms into a funky pyramid:
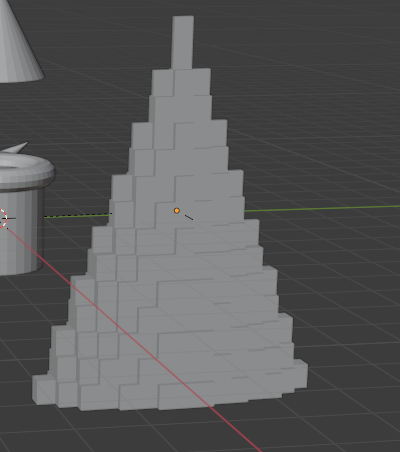
Now re-export the glTF file, but make sure you click the Apply modifiers option in the export menu:

As soon as the glTF file changed, you can immediately observe the new geometry in the Composer viewport:
You can arbitrarily modify all meshes’ geometry and re-export - and the mesh’s changes will be automatically imported by the Composer. Note that nodes and their transformations will not be re-imported. If you move an object or rotate it differently - this change will not be re-imported by the Composer. You can re-import the file, select only the nodes that you want updated and then finally cut-and paste them in place of the old ones.
A note on materials
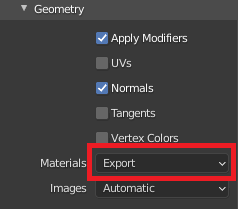
The Composer currently doesn’t import glTF materials. However, if a glTF mesh object has a material assigned, and the Composer contains a material with the same name, then the import will automatically assign the existing material to the imported meshes. Bear in mind that in order for this to work with Blender, the meshes have to have a material assigned to them and you have to export materials in the glTF export menu:
Also worth noting - after import, the material settings (shader uniforms) are taken over from the material instance in the Composer. If you want to take over existing settings, you have to manually transfer them (or copy-paste the newly imported MeshNode over the existing one).
glTF import details
The glTF import option prompts the selection of a glTF file to import, then proceeds to perform a one-time import of all nodes and meshes from that specified file. This option requires selecting (right-click) a node in the Scene Graph view and attaches a root node with the name of the glTF file under the selected node. All imported nodes are attached under that root node. The import menu also offers a selection menu to import only specific objects from the glTF file.
Here is a list of the glTF objects currently supported:
scenes
nodes
meshes
mesh data (accessors, bufferViews, buffers, etc.)
animations
skins
The following objects are not supported (yet):
cameras
images/samples/textures
materials
Even though materials are not supported, there is a special behavior to use material/shaders created in the Ramses Composer project. If a MeshNode N references a material M in the glTF file, and a material with name M exists in the Ramses Composer project, then the imported node N will automatically reference material M. This enables managing a material library in the Ramses Composer project and re-using it for the same scene after it was changed and re-imported.
General note on Blender modifiers
The Blender modifier is a non-destructive operation. It will not modify the original object, and you can reverse the modifier at any time. Exporting the mesh and applying all modifiers is a destructive operation - it will not preserve the original vertices. This is because the glTF format is optimized for runtime, not for flexibility. To get the best of both worlds, keep your modifiers in the Blender scene (or whichever tool you use) and build your custom export scripts to re-create the glTF asset(s) on demand!