Complex Prefabs
You can find the example project here.
Prefabs can be combined and re-packaged to create more complex prefabs. In this example we will demonstrate how to use this feature to manage complexity and structure a project better. It builds on the basic Prefab example, if you haven’t done so already you should familiarize yourself with that chapter first.
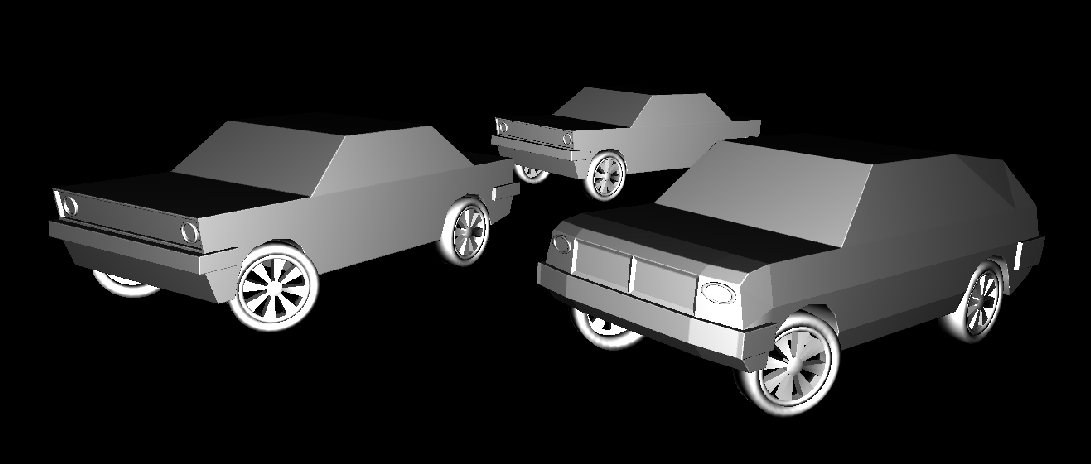
Let’s go Automotive and unleash the full power of the Prefabs! This time we want to build some toy cars, in different variations as a sedan and an SUV. They should be Prefabs, so we can use them to easily create a road scene with many cars later. They should also have some working parts: Spinning wheels and steering control for the front wheels. And we want to do this intelligently, creating only a single wheel and reusing it for all the cars - you guessed it, as yet another set of Prefabs.
We will achieve this by using Prefab Instances inside of Prefabs, thus building up more complex Objects using Prefabs as building blocks. Ramses Composer allows you to do this and there is no limit on how many levels of Prefabs you can combine in a hierarchy - as long as you manage to keep track of your structure.
Exporting the meshes from Blender
The blender scene with some modelled objects is also included for completeness. This chapter has some hints on how to export the objects properly. If you want to learn about complex Prefabs right away, just skip to the next chapter and use the provided glTF files.
The Blender scene contains four objects which we will export into multiple glTF files. While it is possible to use just a single, huge glTF file for all meshes, it is better to seperate them into dedicated glTF files for the objects. This gives better control over what needs to be updated and updates are much faster and less likely to break something. The basic export procedure should be familiar from the cube example.
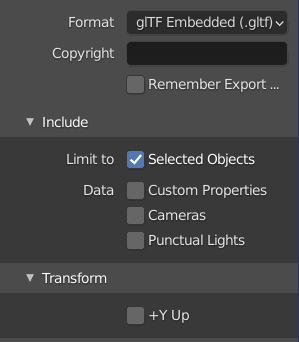
To export individual objects, first select the ToyCar object. In the export dialog, check Include/Limit to Selected Objects. Make sure that the glTF file goes into the mesh subfolder.
Blender uses the Z-axis for “up” while RAMSES and many other tools use the Z-axis for depth. The option Transform/+Y up changes the mesh on export to use the Y-axis for “up”. You can activate this for simple objects. If you export a hierarchy of objects which already includes rotations, this conversion might produce rather incomprehensible rotation values. Then it is better to disable it and do only the required corrections in Ramses Composer. For the meshes included with this example, this option was switched off.
Next select and export the ToySUV object in the same way.
For the wheels, both the Rim and the Tire should go into the same glTF file as we will be using them as a unit. Select both objects holding down the Shift key and export.
Setting up the meshes
As usual, we start by importing some resources from GLTF files.
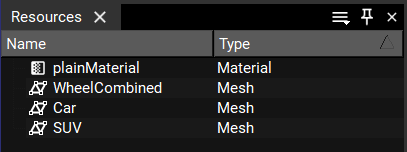
car.gltf and suv.gltf contain the bodies for our different toy cars. wheel.gtf uses a special feature. It actually contains two meshes, a rim for the hub of the wheel and the tire around it. If you don’t need to apply different materials to the meshes, you can combine multiple meshes from the same glTF file into a single mesh resource for easier handling. As we have only one material in this example, let’s apply this to the wheel.
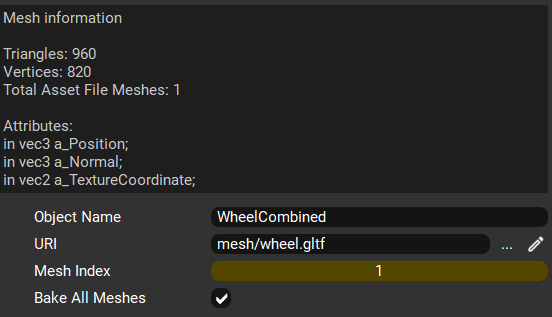
We just need to set the checkmark for Bake all meshes e.g. on the imported Rim Mesh. The Mesh index is ignored in this case. This gives us a Mesh resource combining both meshes from the glTF. We can delete the other imported Mesh resource for the Tire as we will not use it.
As we are not going for effects in this example, we just create a simple Material with a basic shader and apply it to all Mesh Nodes.
The wheel Prefab
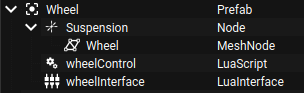
Let’s start with our most basic element, the wheel. Naturally, we create a Prefab and drag in the imported Wheel MeshNode from the scene graph. We also add an additional Node Suspension as its parent, so we can better control the movements of the wheel. The MeshNode itself will rotate to make the wheel spin, the Suspension Node will rotate for steering.
As a LuaInterface for this Prefab we add the wheel_interface.lua script. Our Prefab accepts the following parameters:
rotationAngle controls spinning the wheels.
steeringAngle controls turning the wheel for steering.
reverse is needed to distinguish between wheels on the left side and right side of the car.
Additionally, we add an internal LuaScript wheel_control.lua and link it up with the interface in order to convert the input data:
rotationAngle is transformed into a vector as output, so it can be linked to the MeshNode’s rotation.
steeringAngle is clamped between -30° and 30° to prevent unrealistic angles. It is likewise transformed into a vector and linked to the rotation of the Suspension node.
reverse signals that the wheel needs to be rotated by 180° for correct orientation and needs to spin in the opposite direction.
After linking everything up, this gives us a working wheel. Keep in mind that in complex real life projects you can have multiple interface scripts as well as multiple inner scripts for logic to separate different aspects of your LUA code.
The axle Prefab
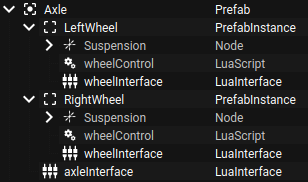
Next we are going to build a Prefab for the axle of a vehicle. It adds the differentiation between left and right wheels, helps to position the wheels as a unit and will be reused multiple times with each vehicle.
To build the axle, we add two Prefab Instances of our Wheel Prefab and name them LeftWheel and RightWheel. One of them should be moved around a little so they don’t overlap and we can see both of them later. As the preview is still empty at this time, we don’t care about proper positioning, we will do this when we have completed our Prefab hierarchy and can see something again.
Last we add the axle_interface.lua interface script. It just takes the angles for wheel rotation and steering and hands them on as output. The output is linked to the input parameters of both wheel Prefab Instances.
The car Prefab
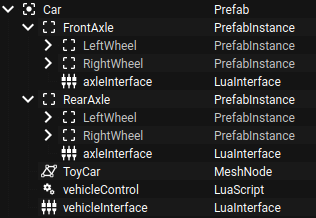
Let’s build our first car. As always we start by creating an empty Prefab. First we drag the imported ToyCar MeshNode over from the scene graph. It contains the body of the car. Then we create two Prefab Instances for the front and rear axle and point them at our axle Prefab. Again, it helps to move one of them a little so they don’t overlap.
Again, we’ll need two scripts: vehicle_interface.lua will be our interface, which has input parameters for rotation and steering with values between 0 and 1 (which just so happens to be the range of the sliders).
Then we add the vehicle_control.lua script and link it to the interface in order to convert those values to degrees which are needed to apply the rotations later.
We link both output values to the FrontAxle Prefab Instance, but only the rotationAngle to the RearAxle as cars usually don’t have steerable rear wheels.
Fine tuning the Prefab
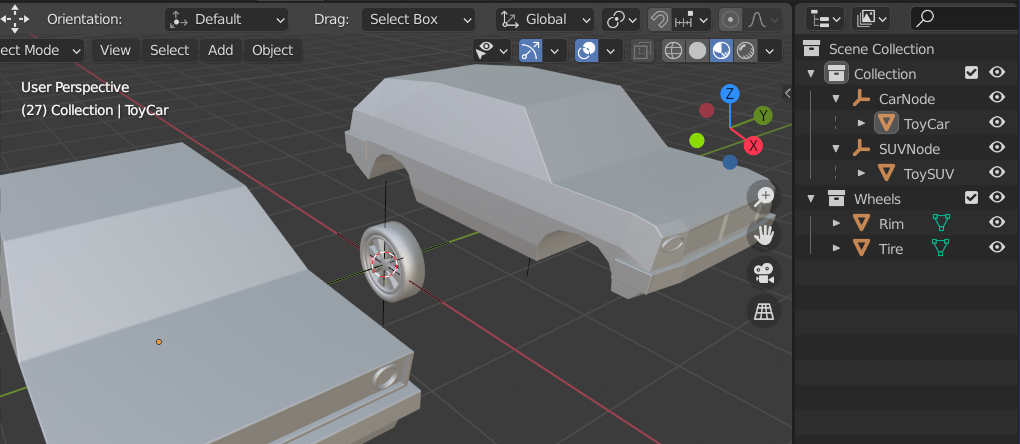
By now you are probably desperate to see what you have been doing in the preview window. So let’s create a root Node for the scene and attach an instance of the car Prefab in the scene graph. Your car should appear - and it probably looks still pretty messed up. We need to adjust the positioning now. You can do this in the Prefabs - and as the Prefab Instances are updated immediately, you will see the effect in the preview right away.
Keep in mind that Blender uses the Z-axis for “up” while RAMSES uses the Z-axis for depth. Here we adjust for that by simply rotating the root node by -90° on the X axis. This gives all objects in the scene the proper orientation.
First go to the axle Prefab in the Prefab View and find your left and right wheel. At the moment, both are looking in the same direction and one of them needs the property reverse checked so both wheels face to the outside. With that done, change the translation of the wheels until they match the width of the car’s body. To do these adjustments you probably want to view your scene from different directions. Rotate the root Node with the sliders or by entering values like 90 degrees for exact perspectives to view your objects from all sides while leaving their relative positioning untouched.
Next select the car Prefab and likewise adjust the translation of your front and rear axle Prefab Instances to match the fenders of your car body. This should look much more like a proper car now.
Finally, let’s check whether the car actually drives. Select the interface script of your car Prefab Instance in the scene graph and play with the sliders for wheelFactor and steeringFactor. If all links are in place, you should see the wheels spin and the front wheels turn.
If it does not perform as expected yet, there is probably a link missing on some level or a script is not cooperating. You can check the operation of all parts in the scene graph. The contents of Prefab Instances are disabled and cannot be edited, but you can select them and inspect all their properties. So expand the whole Prefab Instance and have a look at the interface script of your car first, whether it produces the expected outputs. If this looks good, check the links on the interface scripts of the axles for missing links or unexpected values, then their script output and so on, until you arrive at the links on the uniforms of the wheels’ MeshNodes. If there is a missing link or processing error you should find it this way. To fix it, go to the Prefab View and edit the respective Prefab.
The SUV Prefab
That leaves creating the SUV. In our case we will do a simple copy. In the Prefab View, select the Car Prefab, copy and paste it. Then rename it to SUV, delete the Car MeshNode inside the Prefab and drag the imported SUV MeshNode from the scene graph into your new Prefab.
Now we are ready to add another Prefab Instance to the scene and point it at the SUV Prefab. You should see your SUV and its wheels should spin and turn right away. Now you are set up to create many instances of your two cars in the scene with almost no effort.
This might be a good time to clean up and delete the empty Nodes in the scene graph left over from the mesh imports.
If you have many slightly different vehicles with many complex functions, you might consider extending the concept and adding another level of Prefabs rather than copying existing vehicles. This means creating a generic vehicle Prefab with common features first and then reusing an instance of that in concrete car Prefabs. Or maybe creating a generic truck Prefab and then using instances of it in multiple individual truck Prefabs.
And always remember: The Prefab magic disappears as soon as you press the export button. It will be transposed in a complex scene graph for the renderer and a set of linked scripts for the logic engine. You will not find any Prefab objects at run time.